01The idea
The room is small and the ceiling is a flat 96″, so every inch of headroom counts. The loft runs the full length of one wall with Sterling's bed on top; the queen sits below for guests. It's a painted-wood build, sized to a real tape measure and checked by an automated set of fit/clearance/safety gates before a single board gets cut.
02The design, decided
Each choice was made deliberately — trading headroom, cost, safety, and how the kids actually use the space.
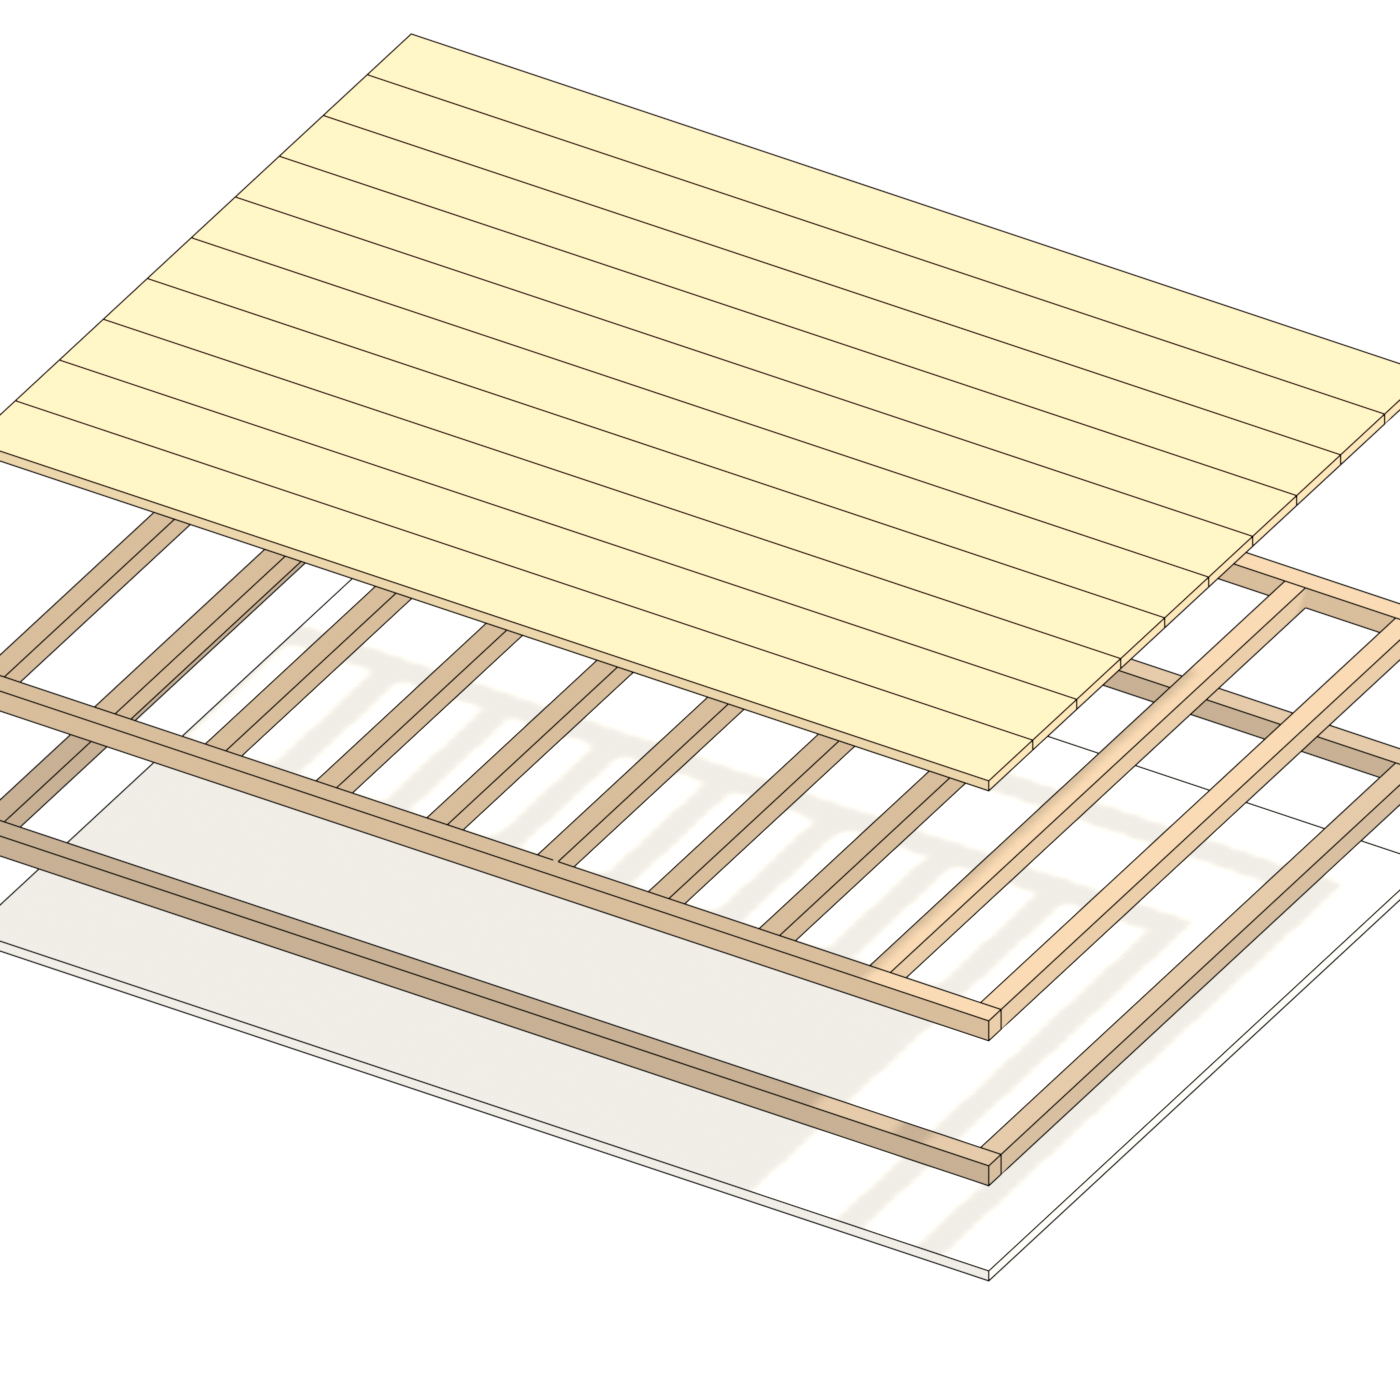
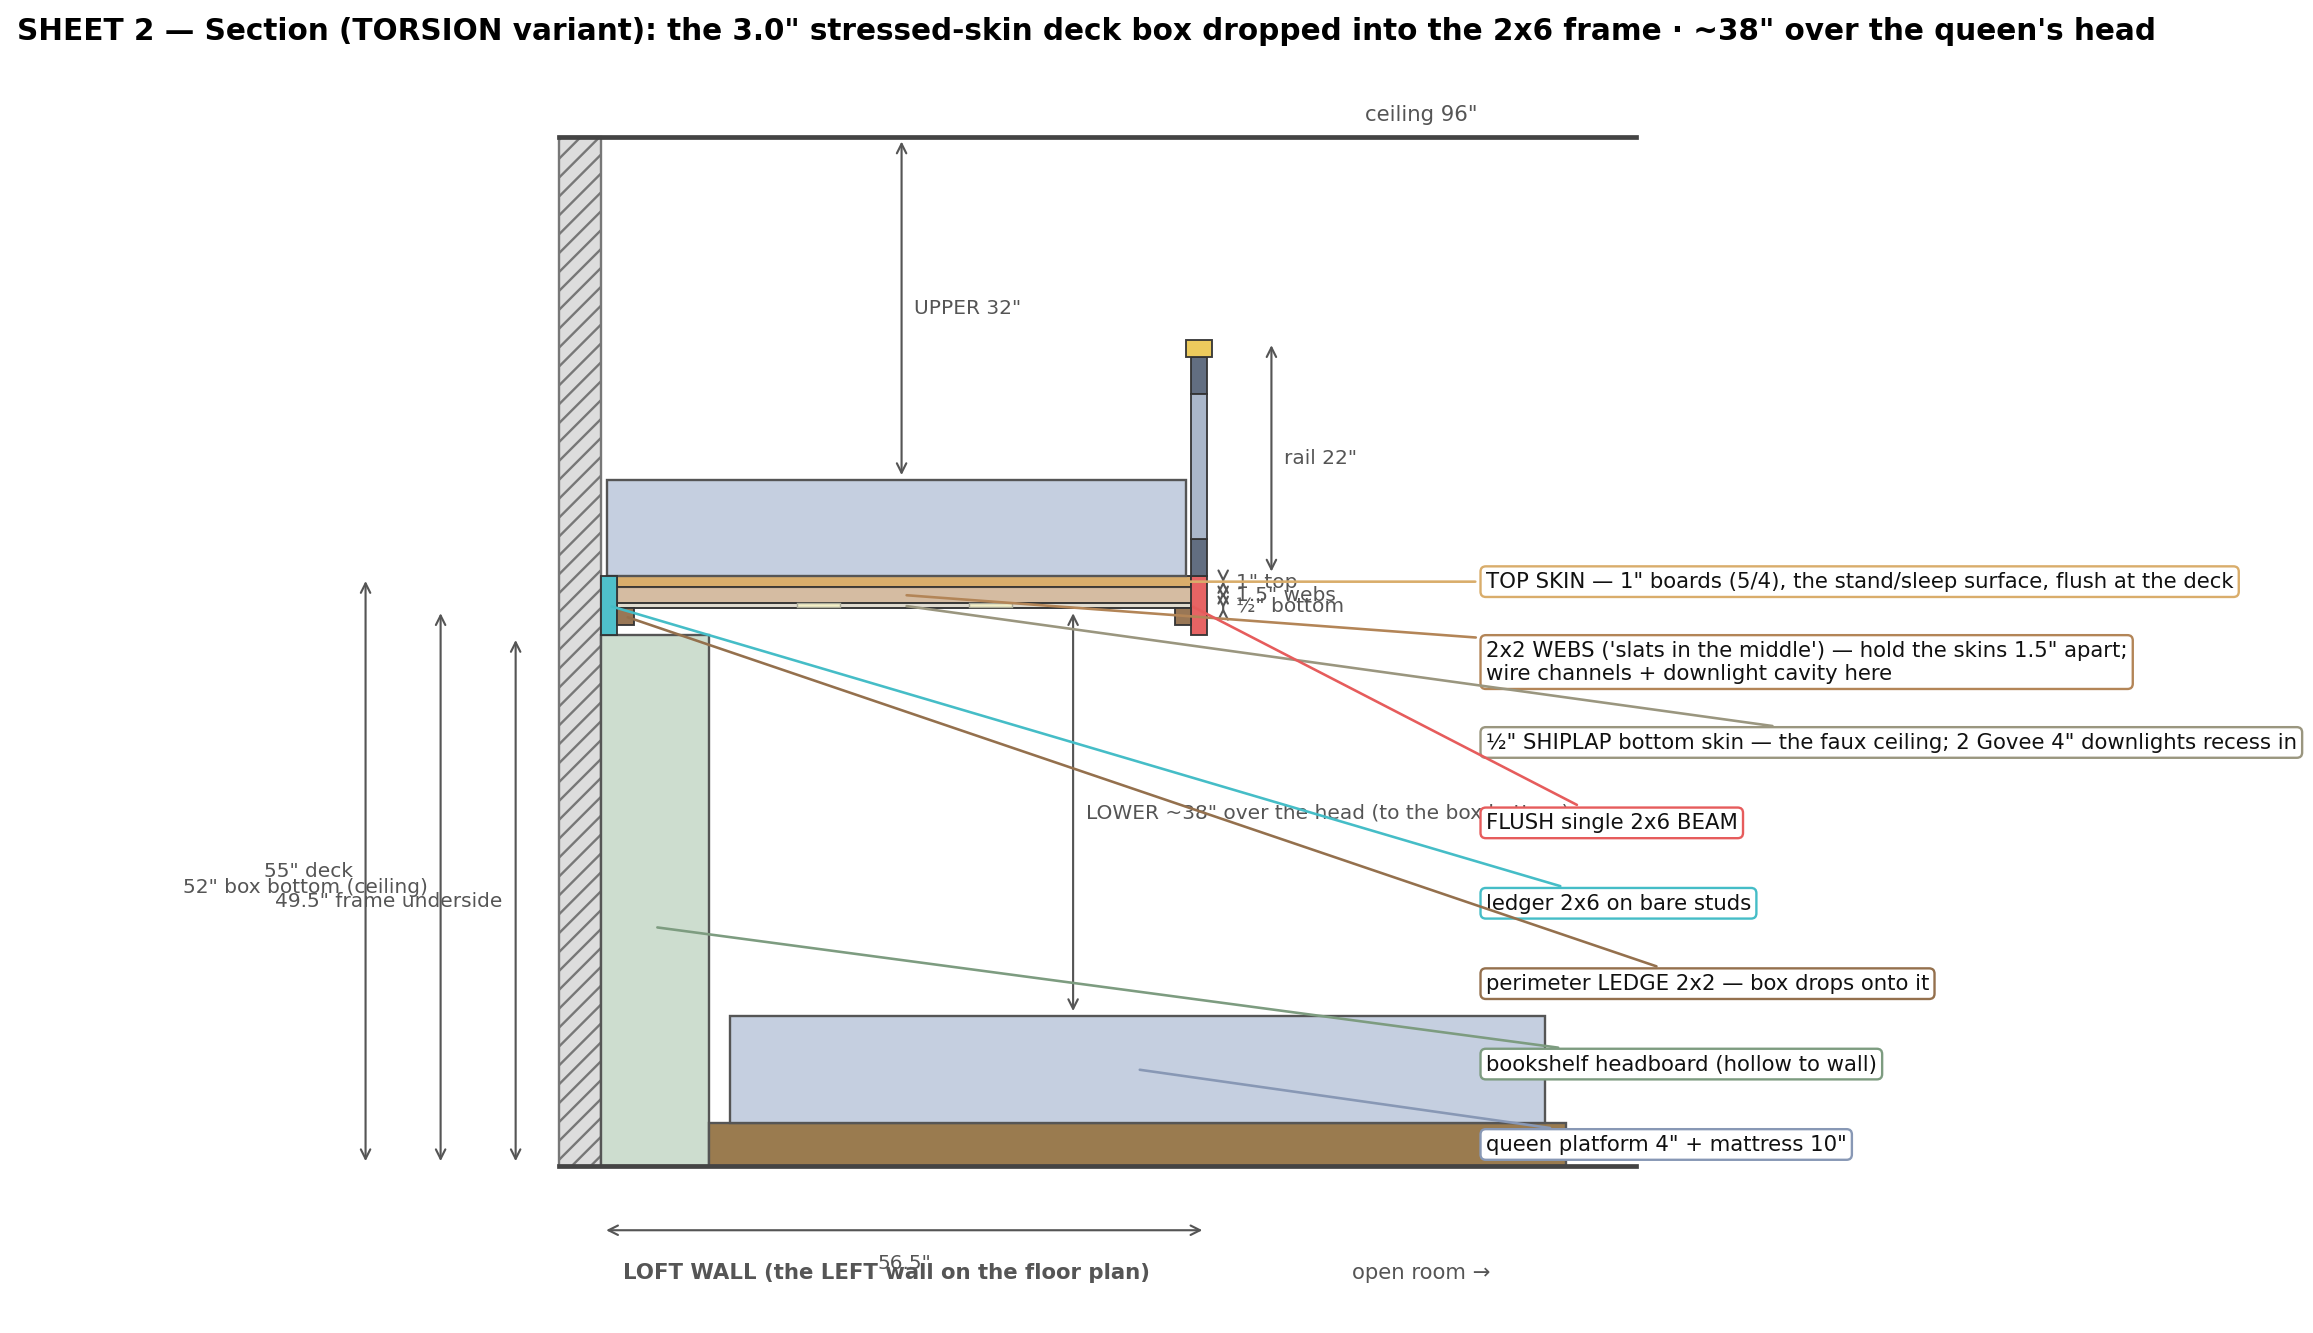
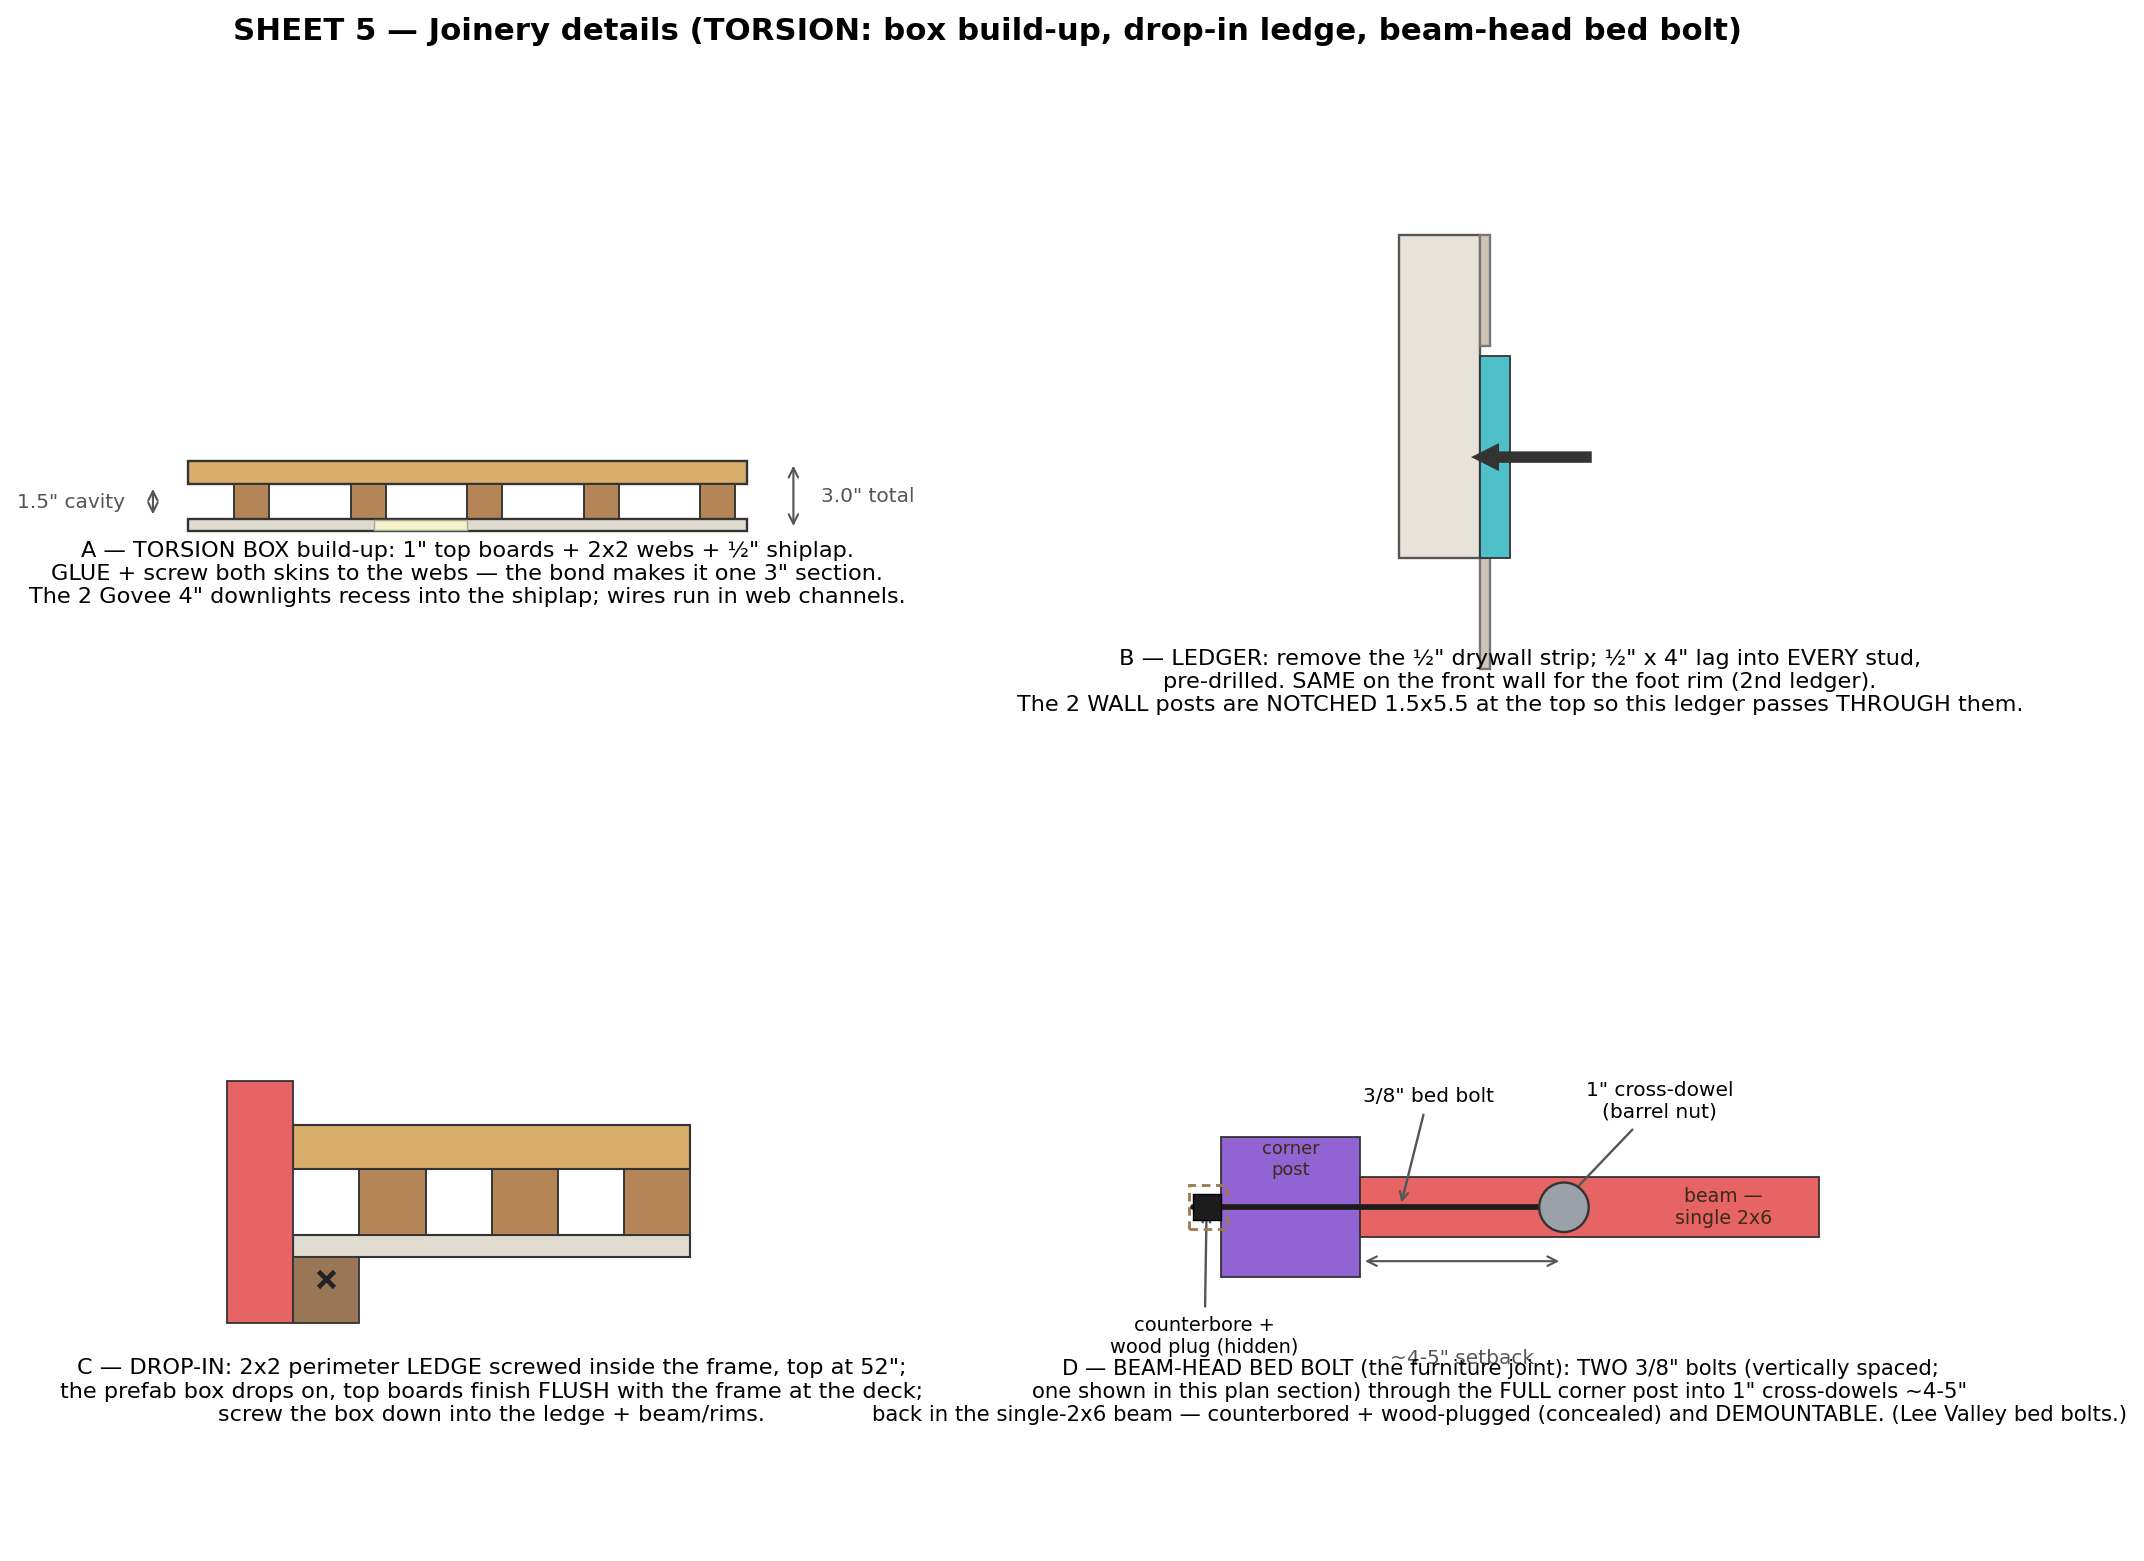
- A torsion-box deck, not slats. The deck is a 3″ stressed-skin panel — 1″ top boards over 2×2 webs over a ½″ shiplap bottom. Two skins held 3″ apart act like the flanges of a deep beam: ~6× a slat's strength, ~21× the stiffness, and the cavity hides the 2 recessed downlights + wiring.
- Sized as a bunk, not a floor. Calibrated to Ryan's proven bunk, not a 40 psf floor load — holds well past 500 lb (3 small / 2 large adults), with the box adding a big margin on top.
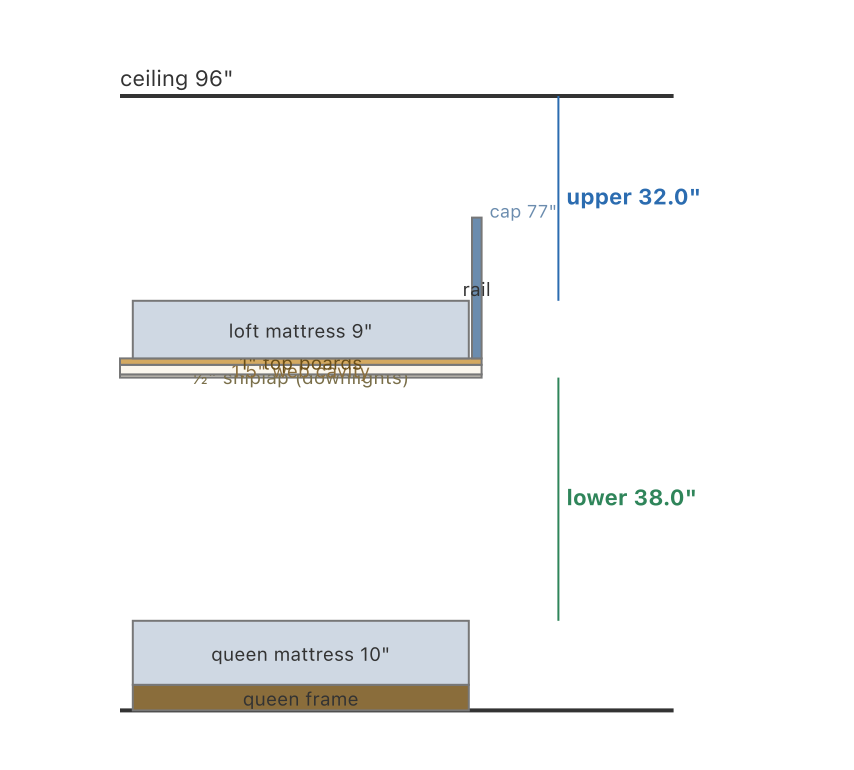
- ~38″ over the queen. The box bottom sits at 52″; the head rises into the open frame cavity to it — ~38″ over the sleeping area, up from the old 35.5″.
- Lighting built in. 2 dimmable Govee 4″ downlights recess into the shiplap bottom skin (the faux ceiling) over the queen; an under-bed toe-kick LED + the headboard shelf LEDs round it out, all on a bed-aligned 3-gang switch. Wires run in channels routed into the webs.
- Built like a bed, not a deck — no hangers. Every frame-to-post joint is a bed bolt (a 3⁄8″ bolt into a cross-dowel a few inches back in the rail) — the canonical bed-rail-to-post joint, concealed (counterbore + plug) and demountable. The deck rests on an interior ledge. Not one joist hanger: hangers are deck hardware; this is furniture.
- A grab post, not a knee wall. A floor-to-rail 4×4 GRAB POST at the 24″ opening — twin of the corner post, bolted through the drawer cabinet — replaces the knee wall and the newel (the post kids grab).
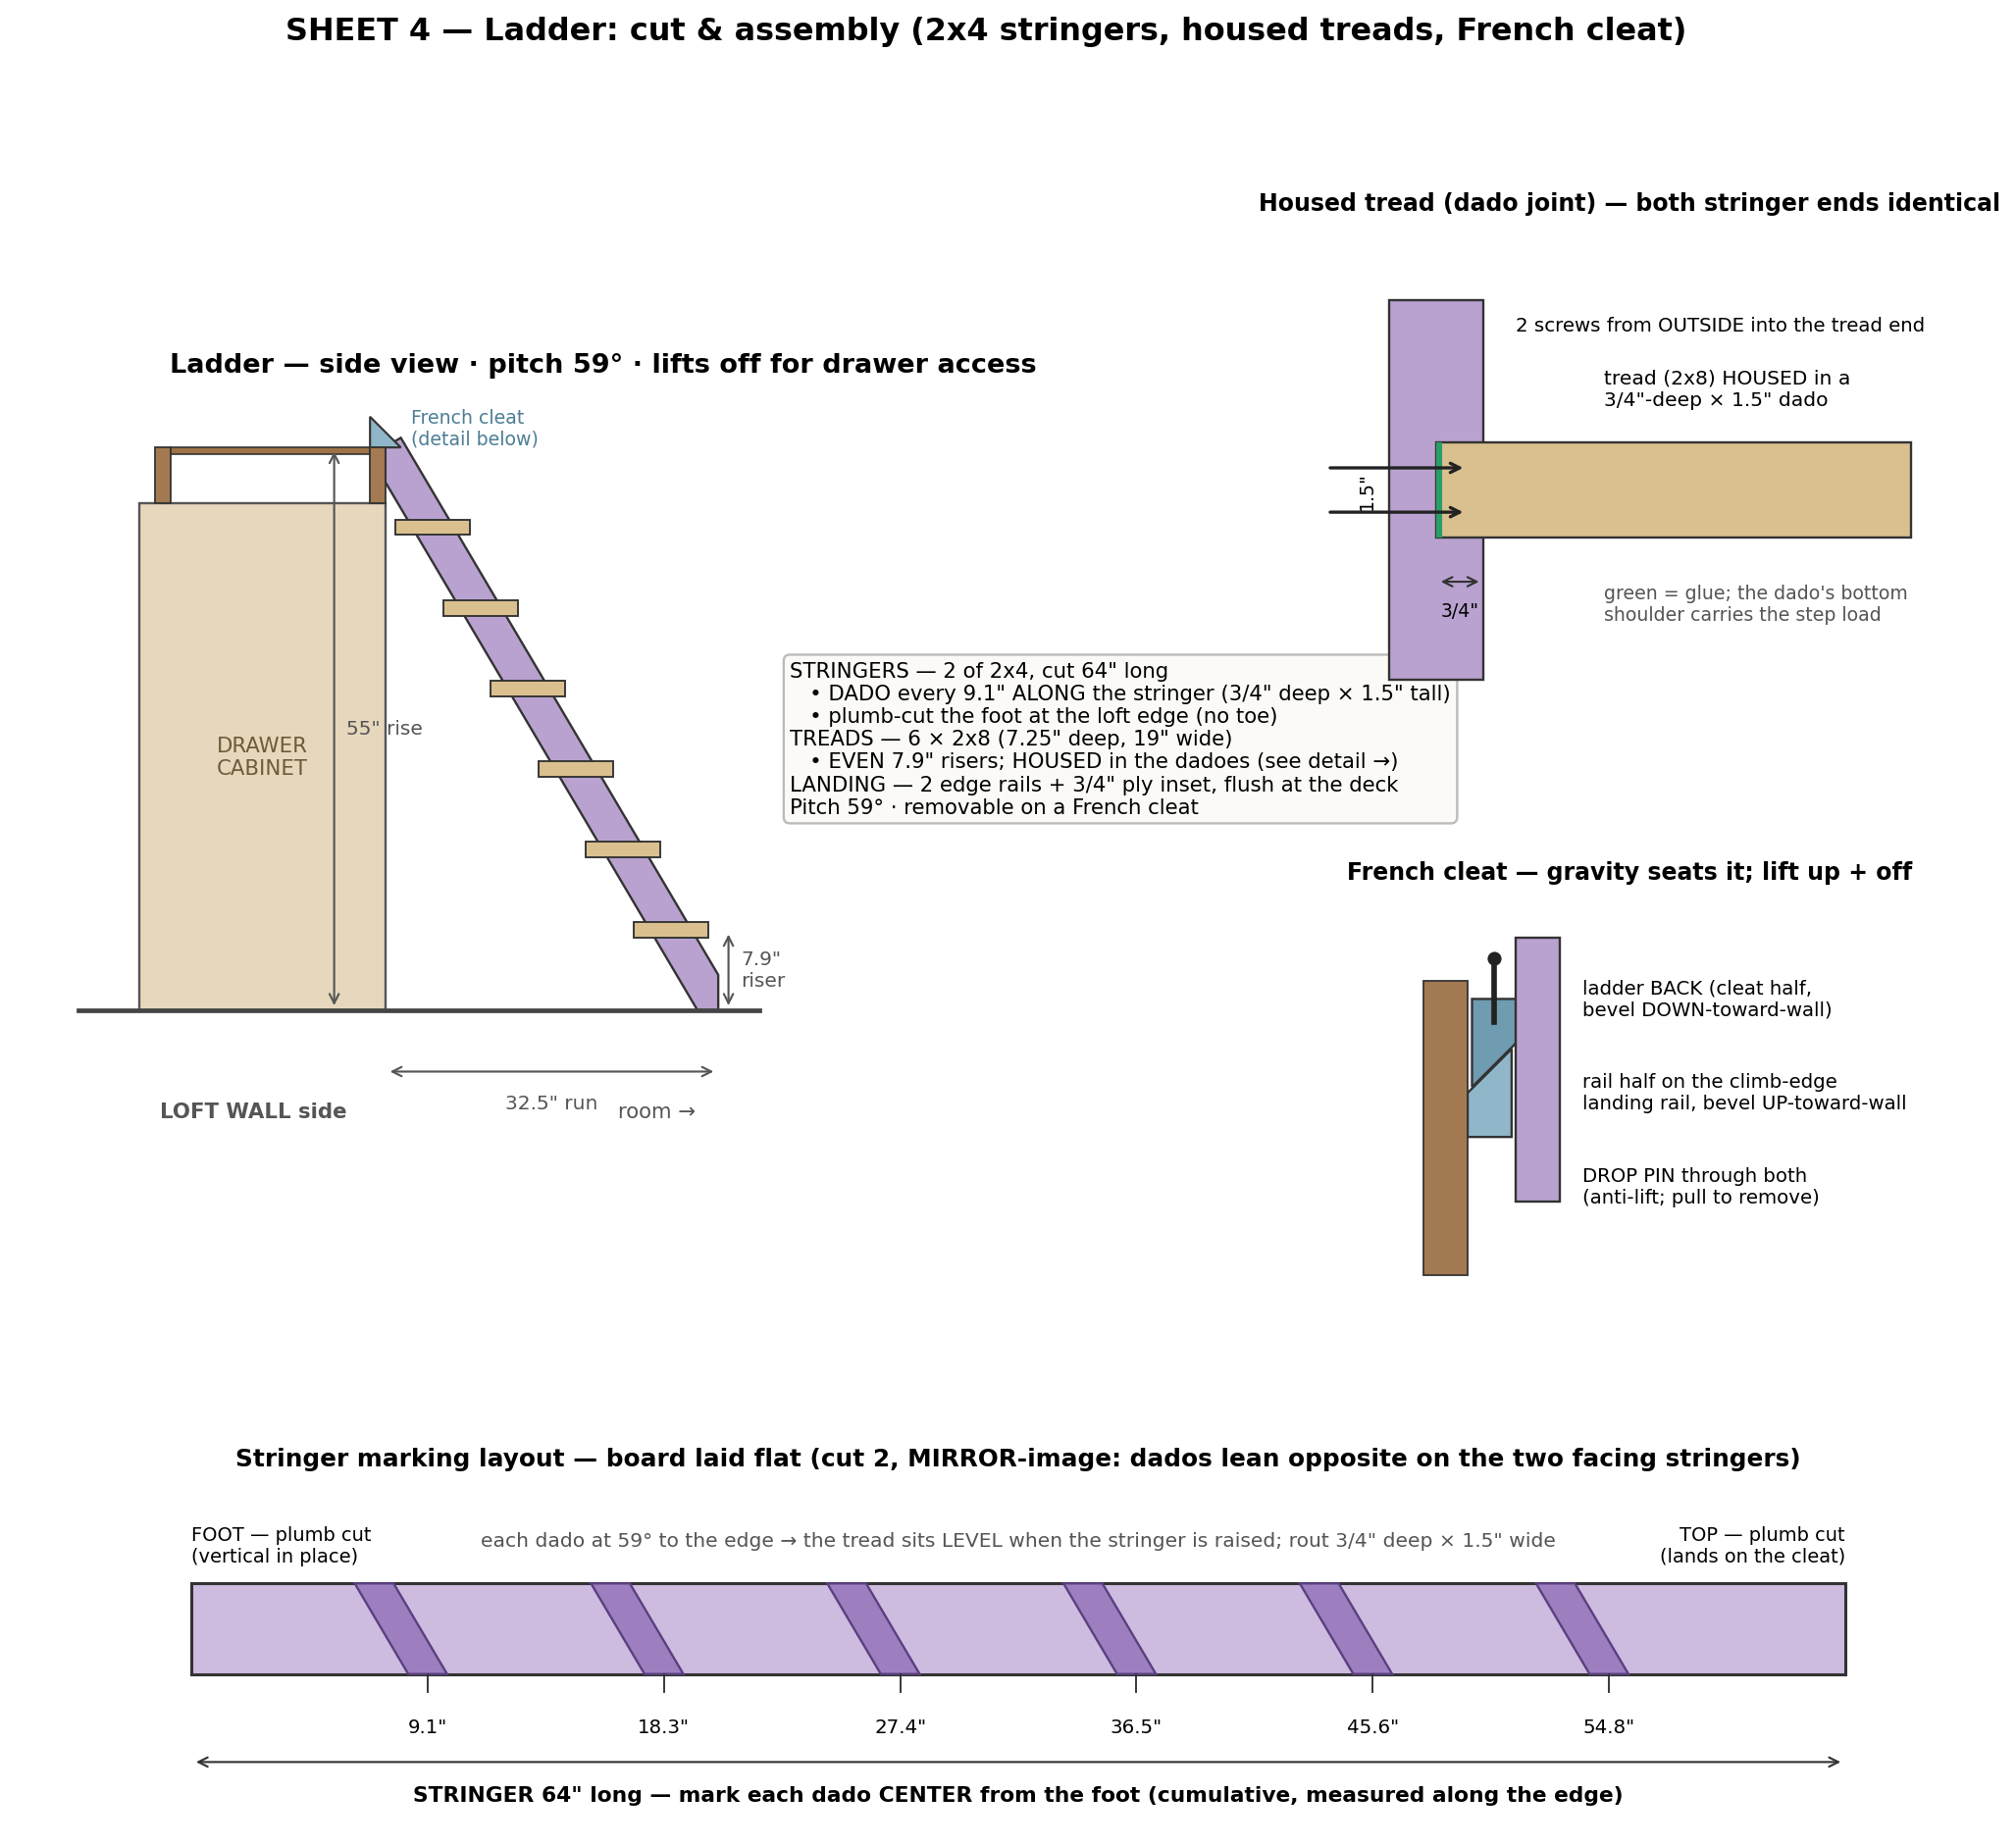
- Ladder on a French cleat. Lifts off to reach the drawers, drops back and locks — no ceiling hook.
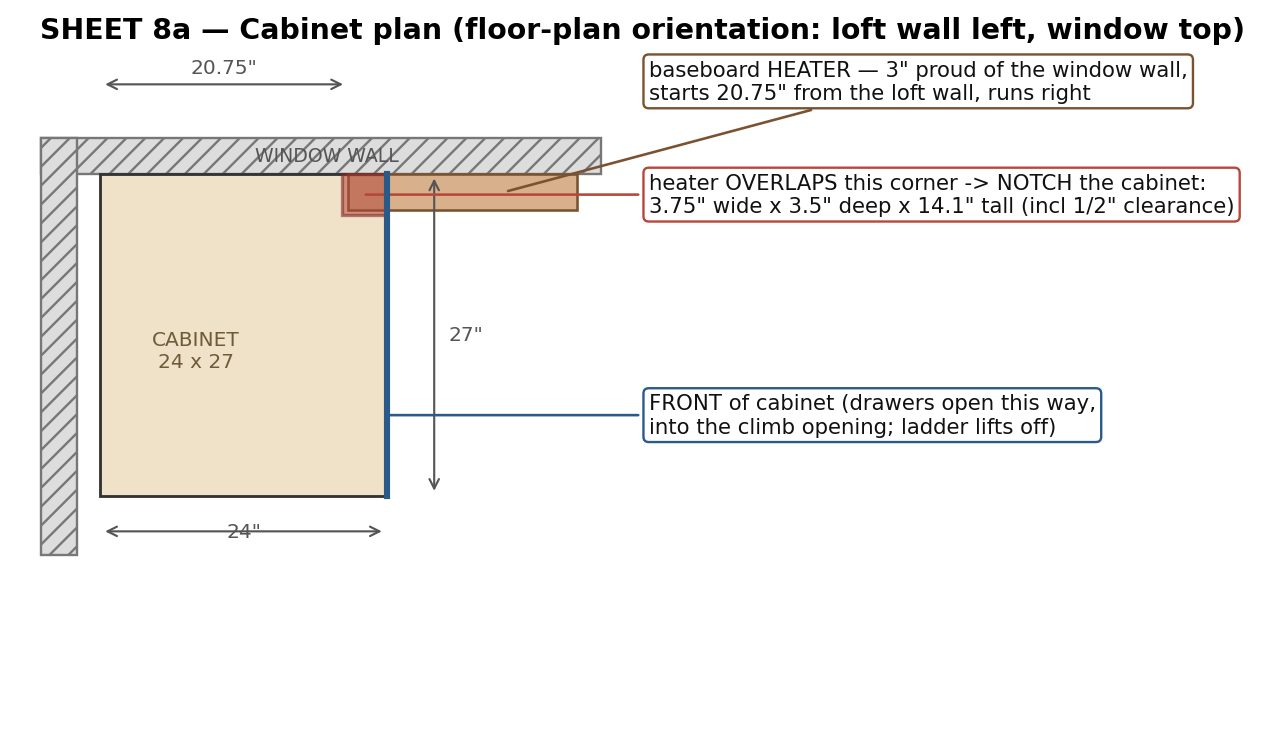
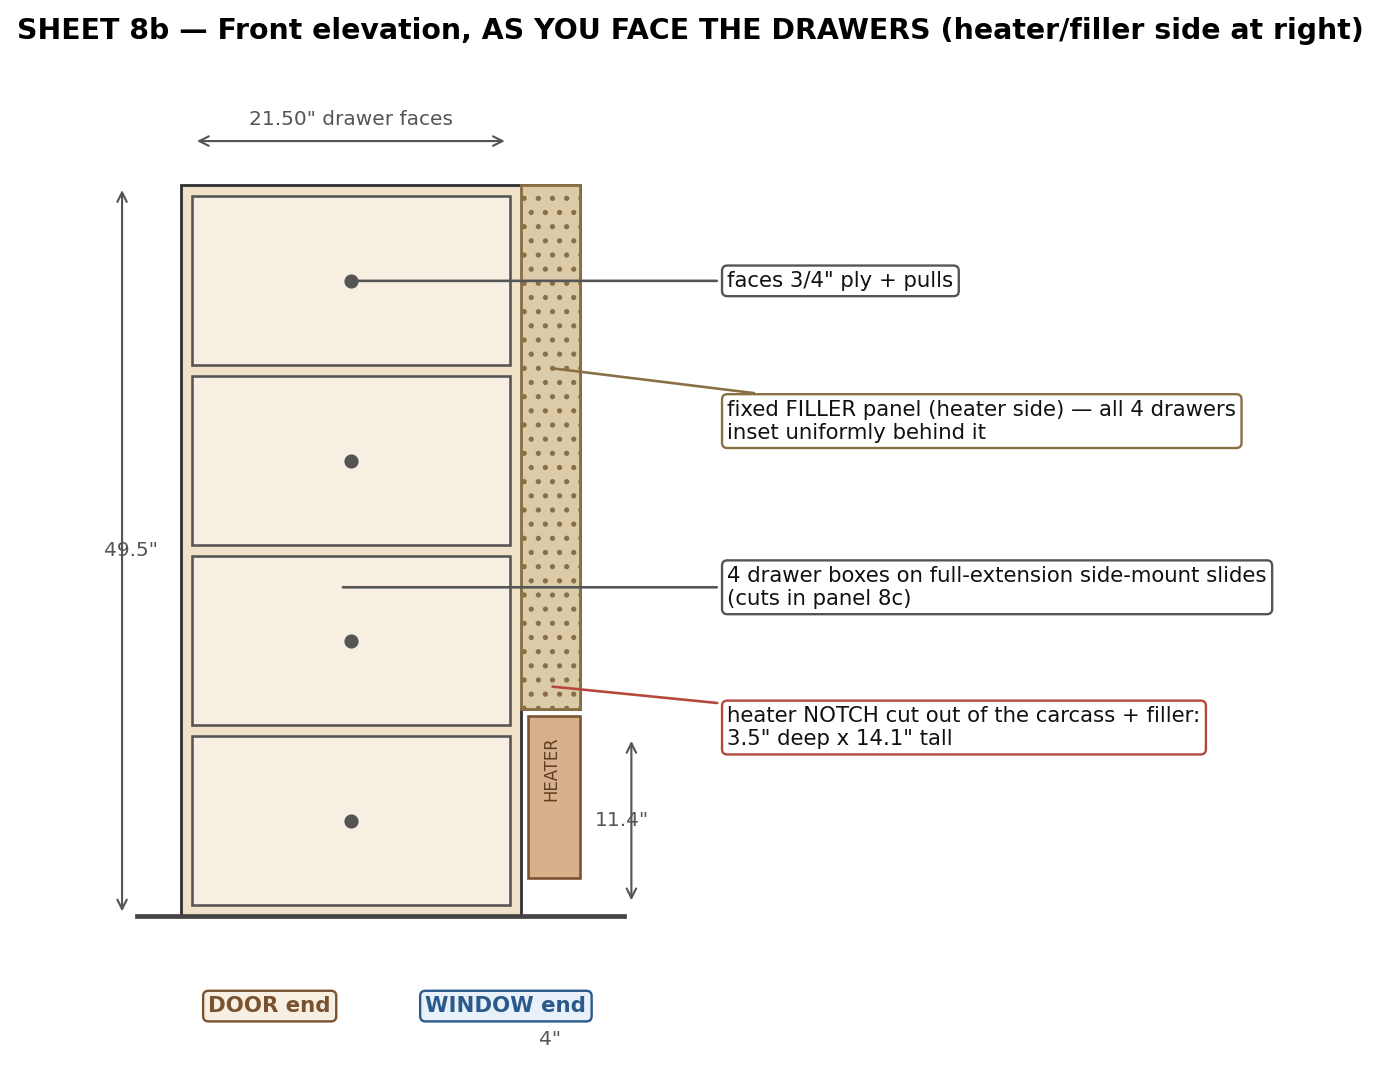
- Drawers under the landing. A 4-drawer cabinet, bottom-right corner notched around the heater.
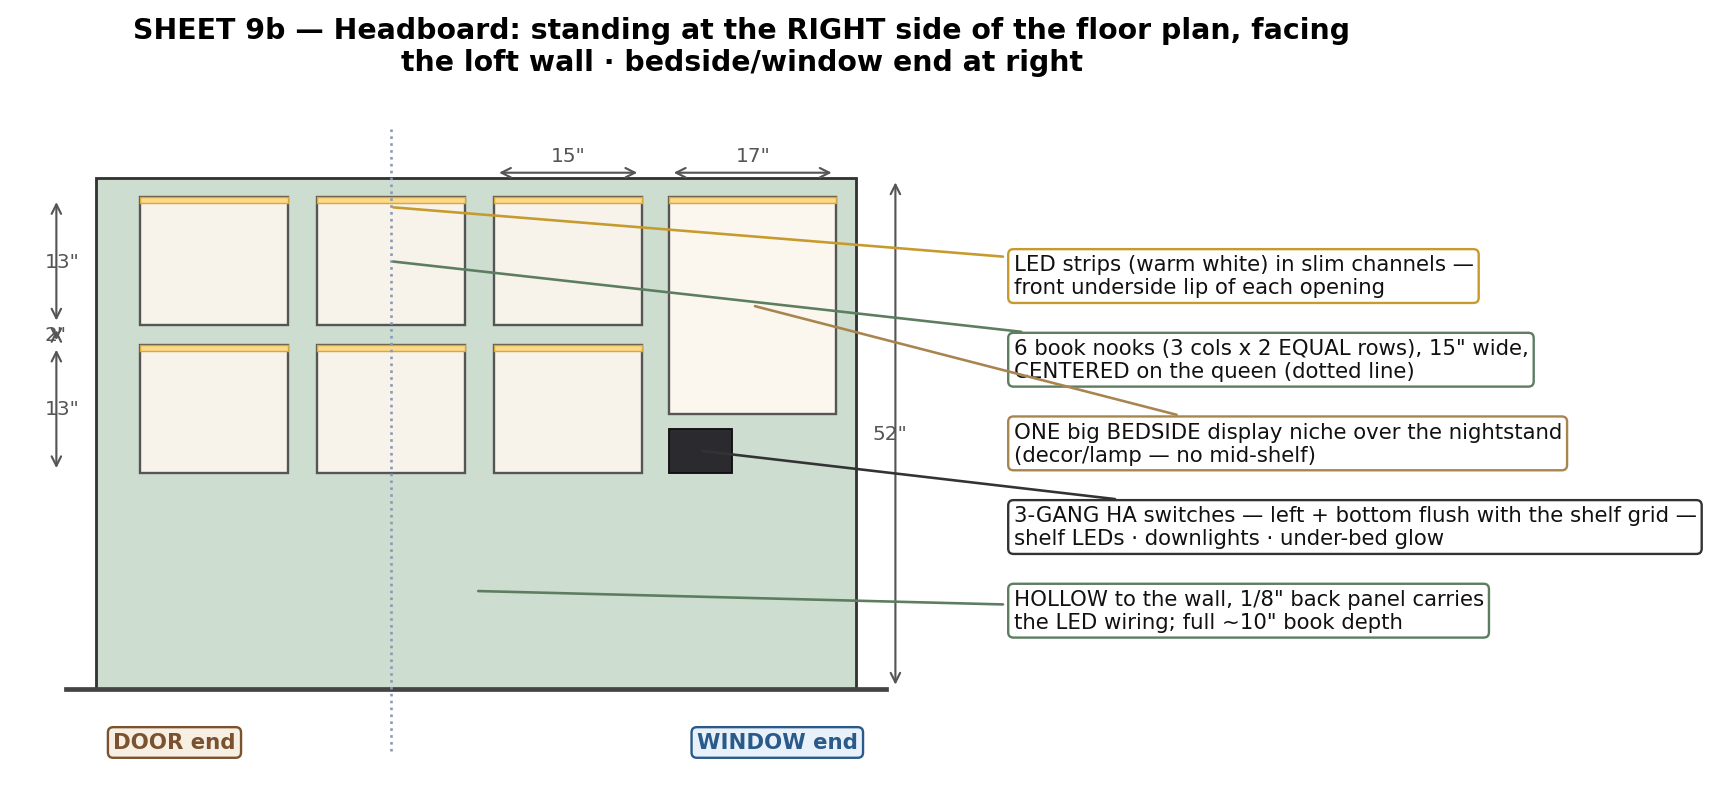
- 10″ hollow bookshelf headboard. Two rows of cubbies over the bed, open to the wall — its top carries up to meet the faux ceiling (the torsion-box bottom), so no framing shows in the gap above it.
- Stained, not painted. Hand-picked clear faces (esp. the top deck boards), stain + water-based poly.
- Both mattresses spring. Sterling's existing one (54 × 75.5 × 9″) up top; a new spring queen below.
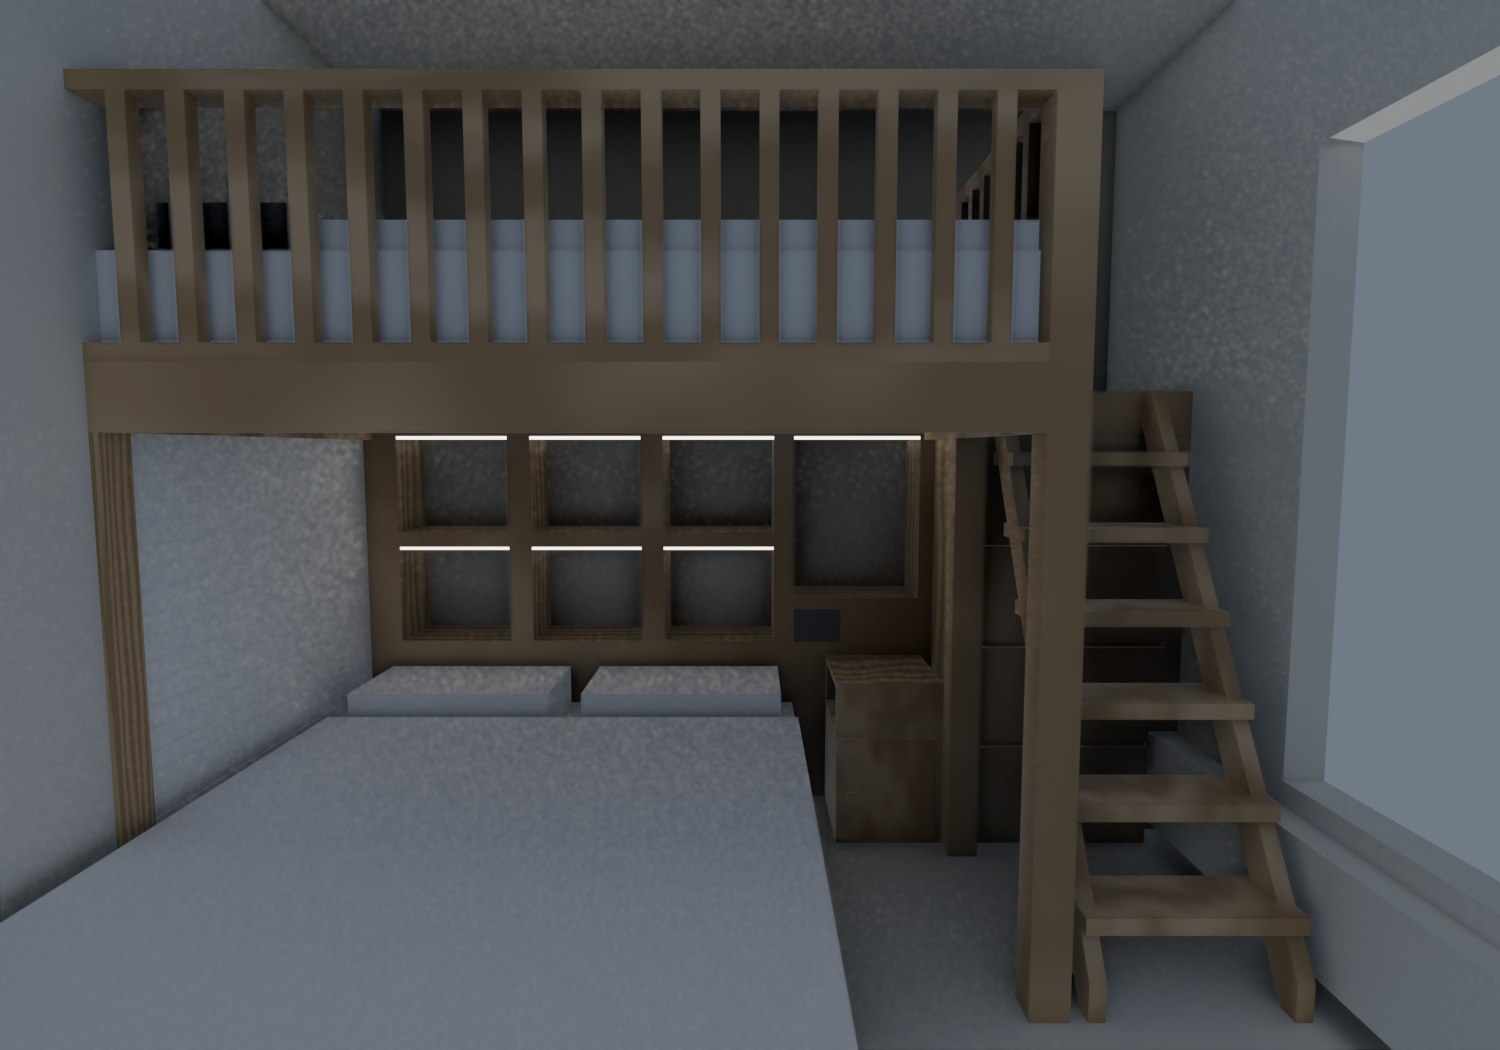
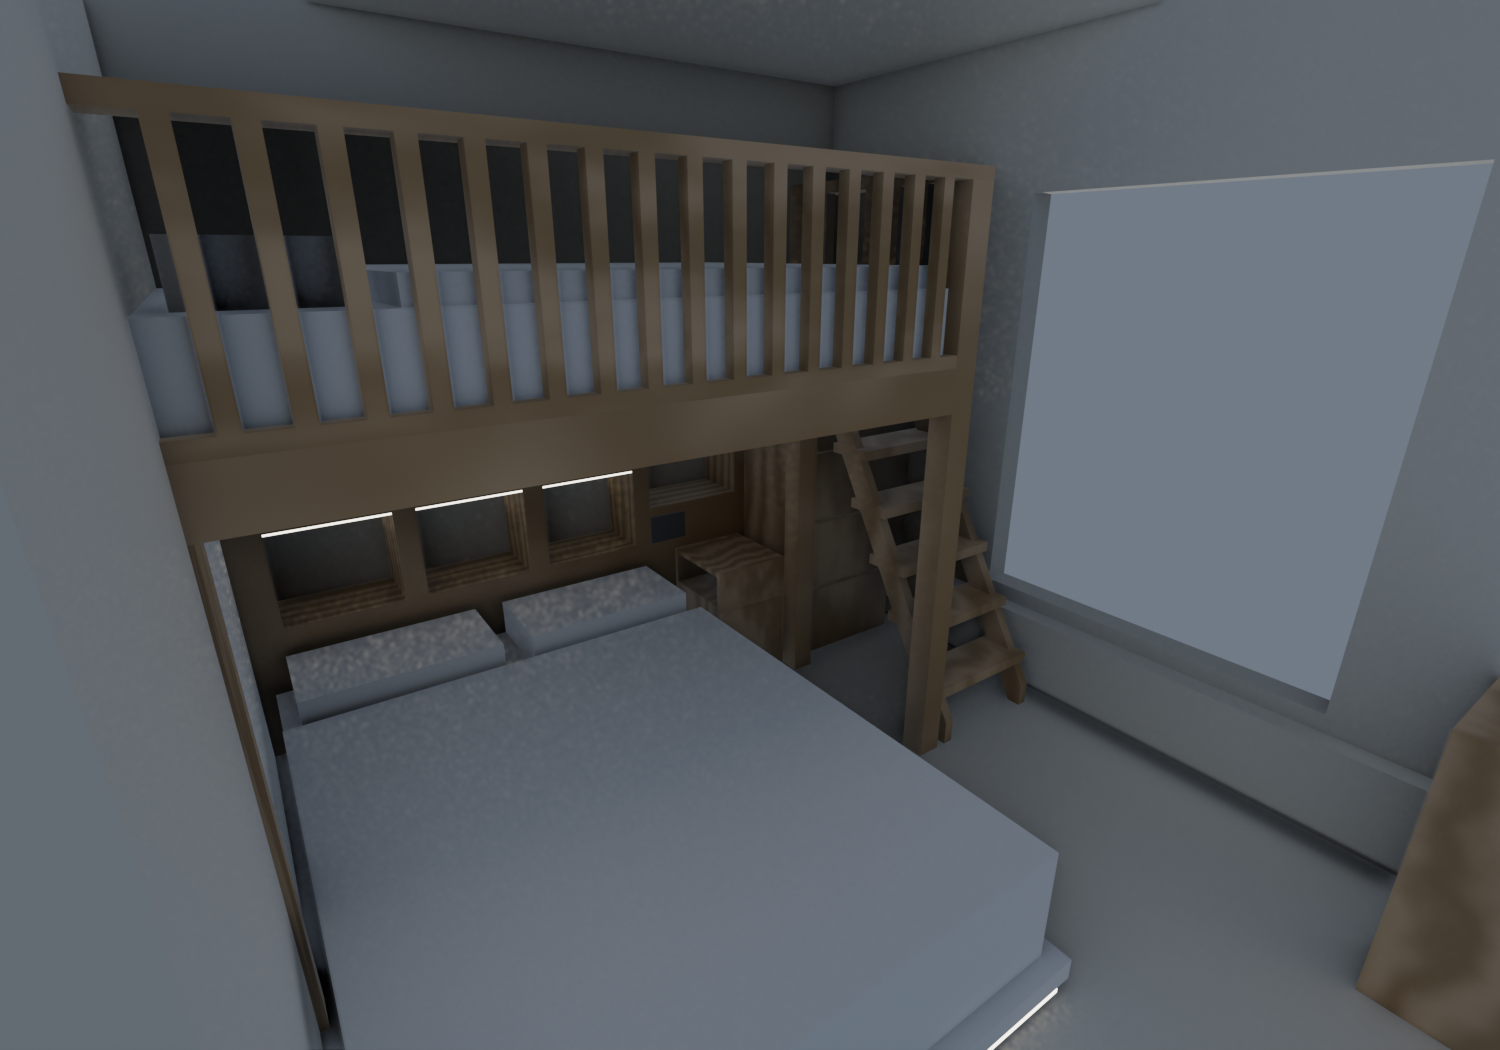
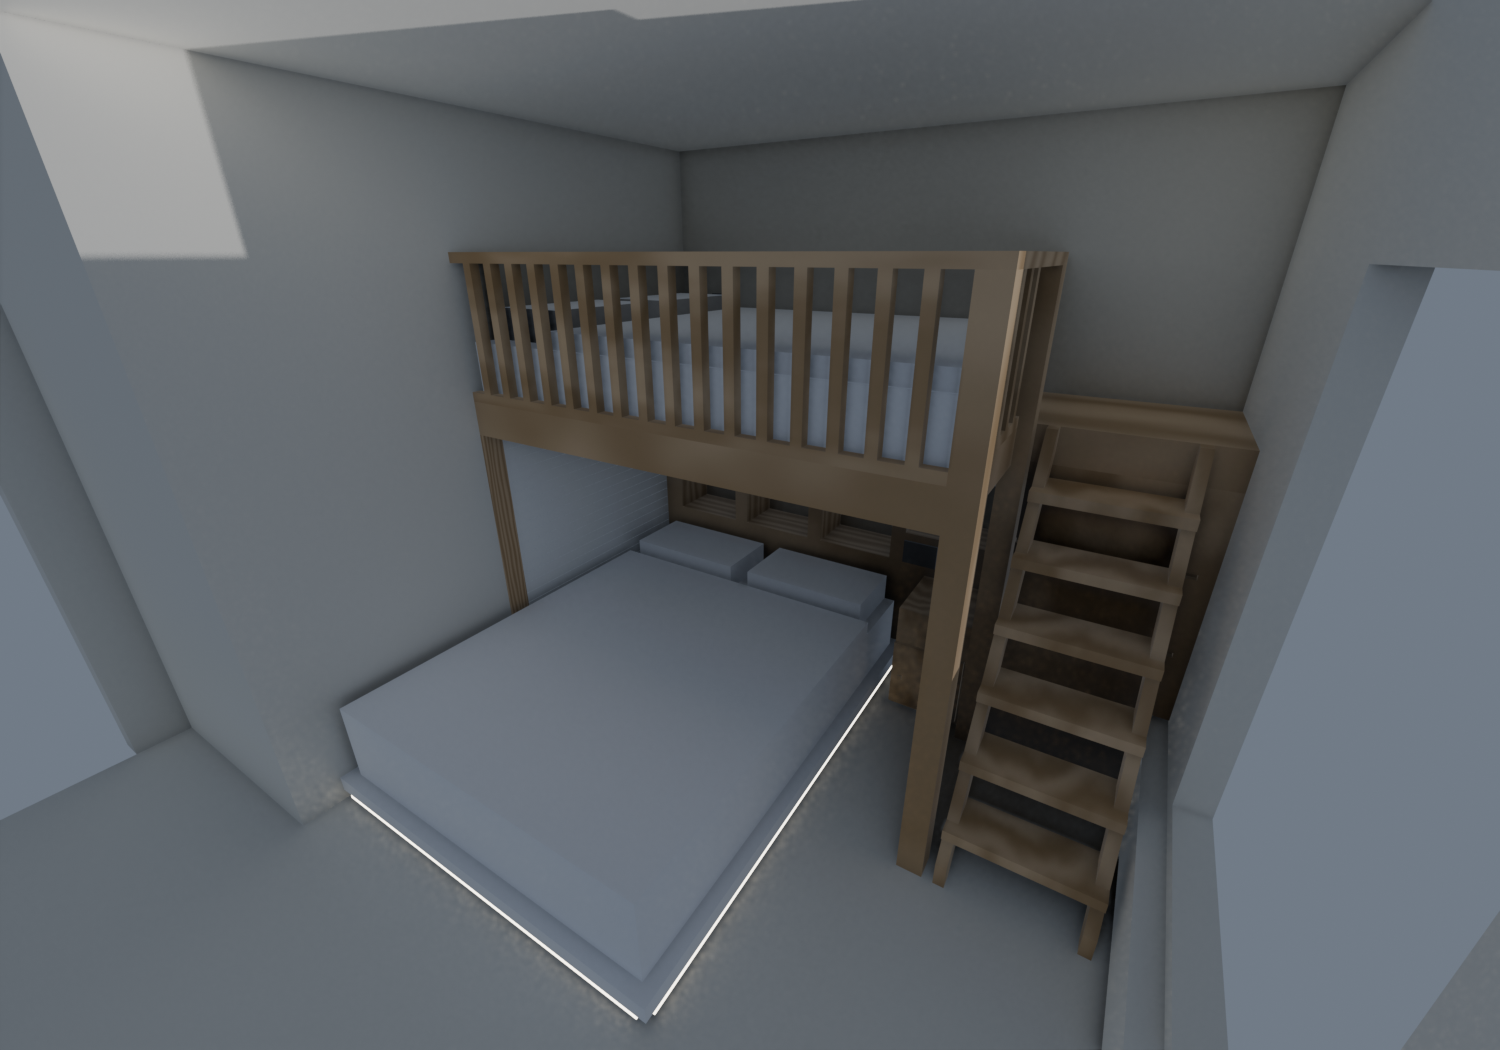
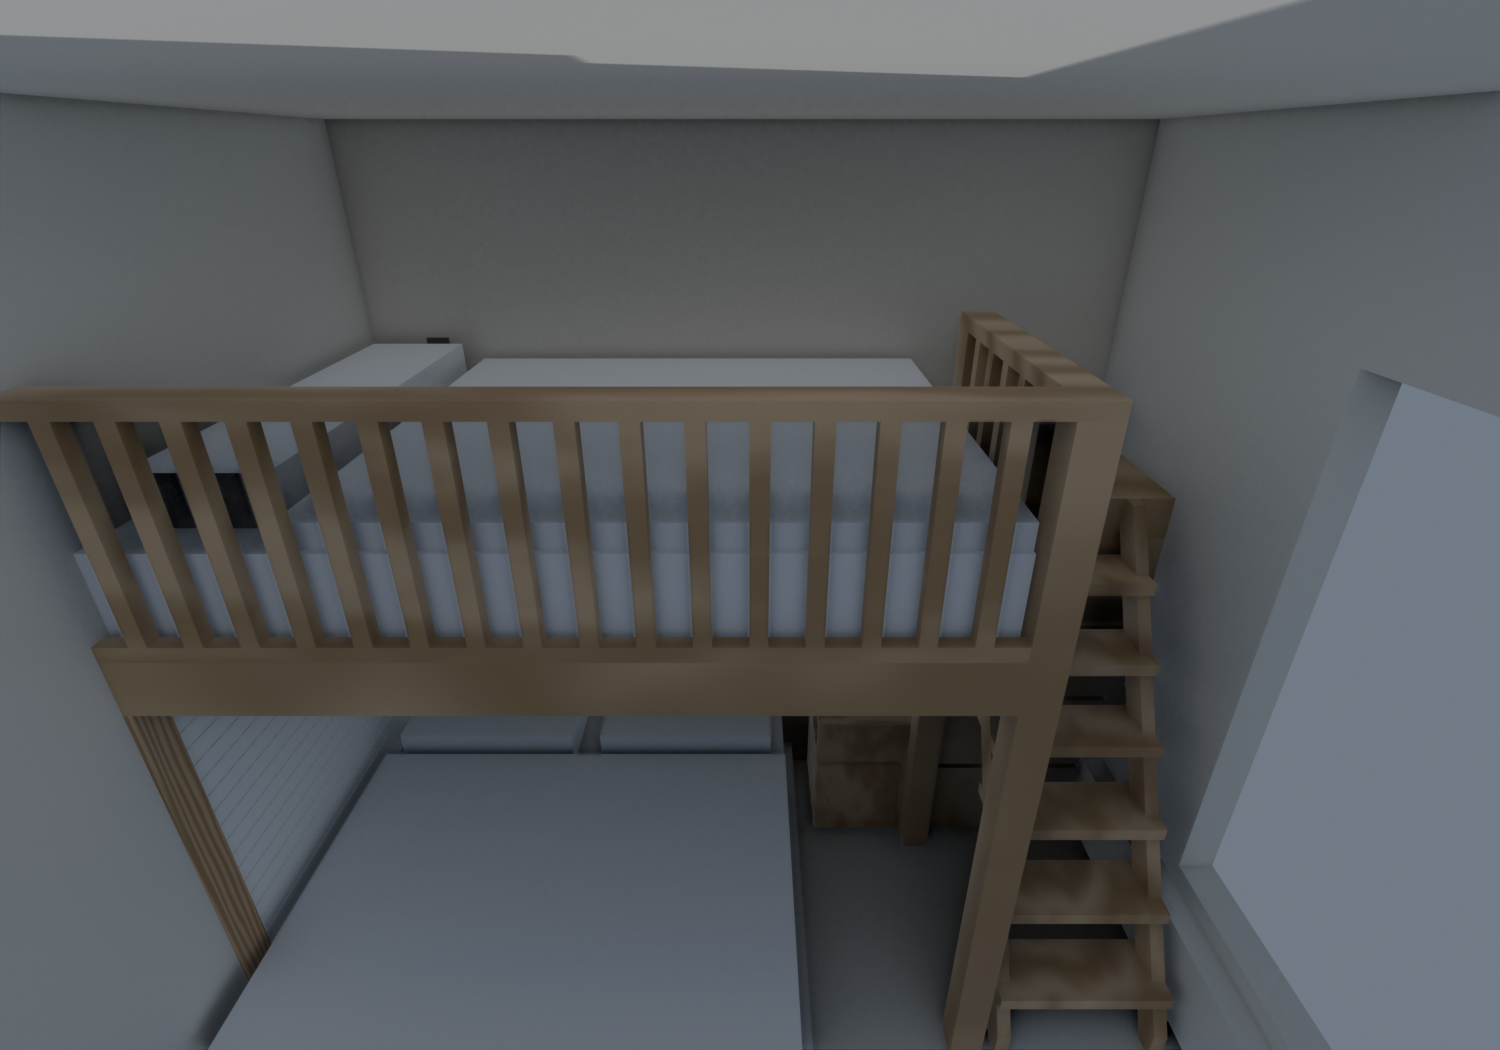
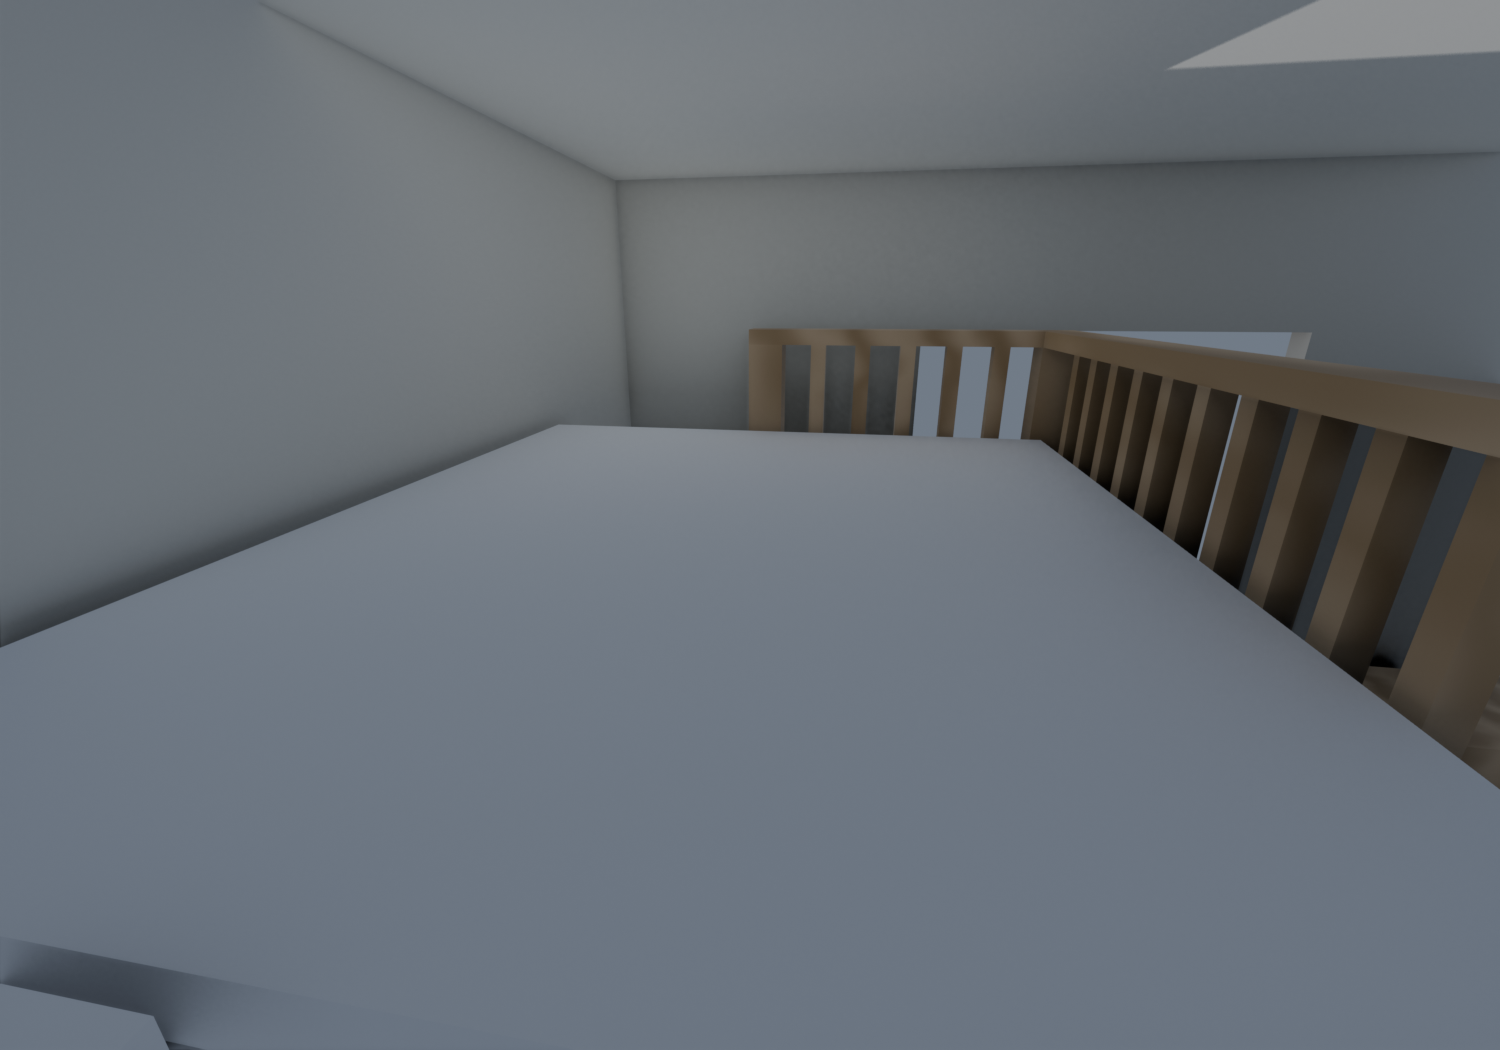
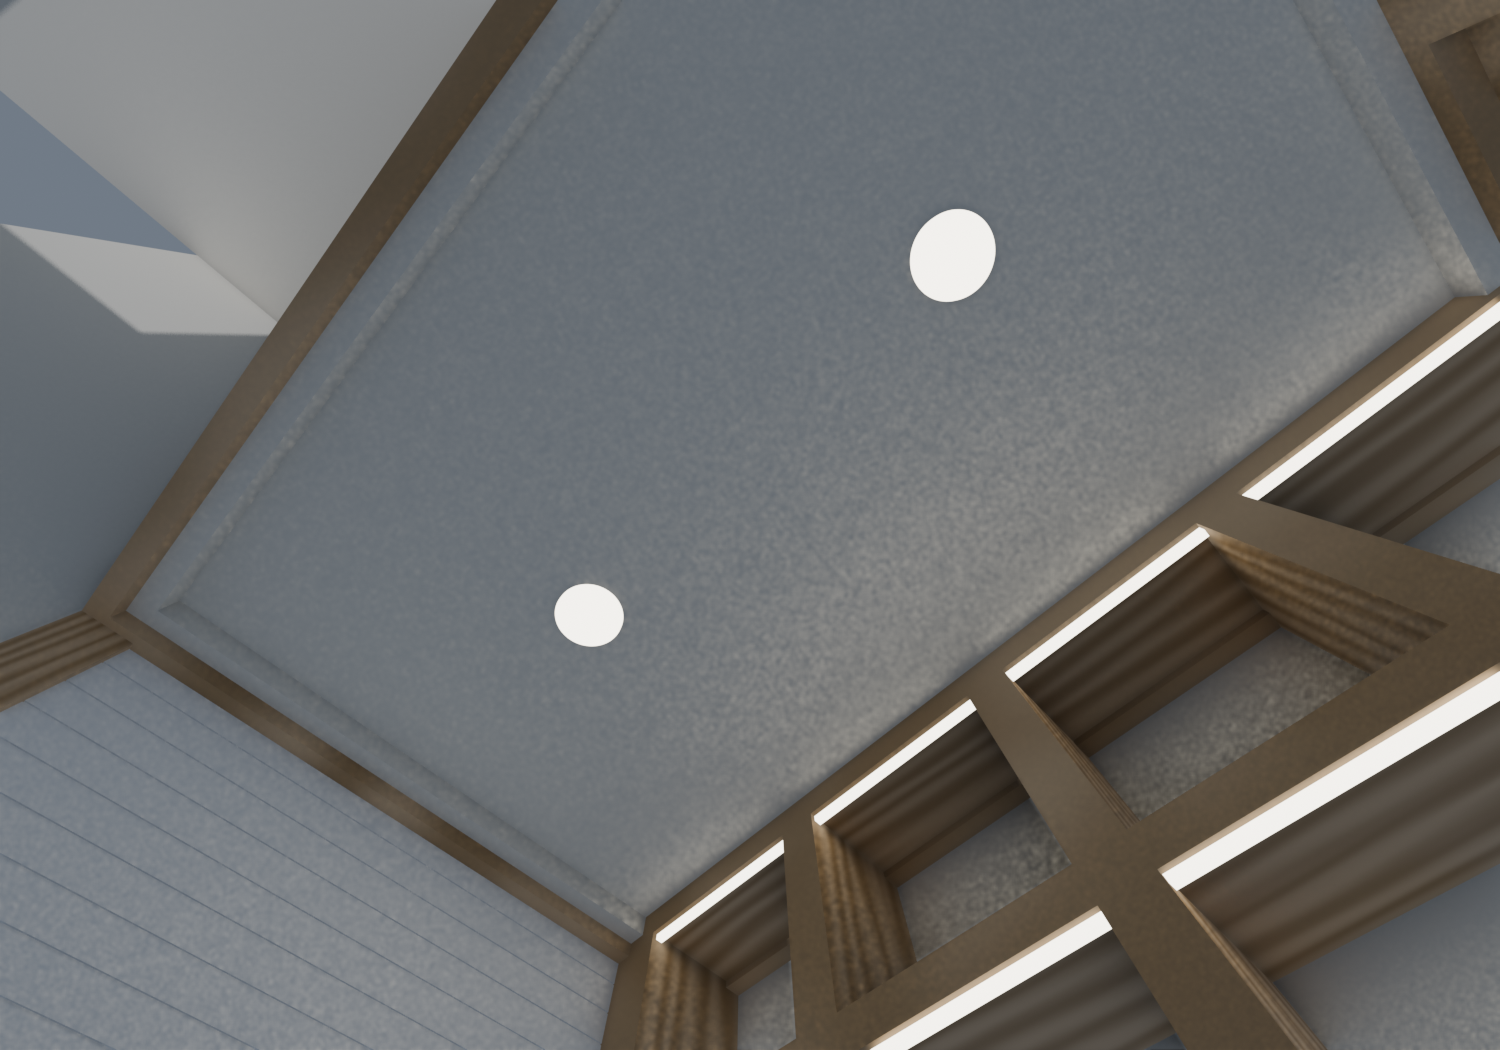
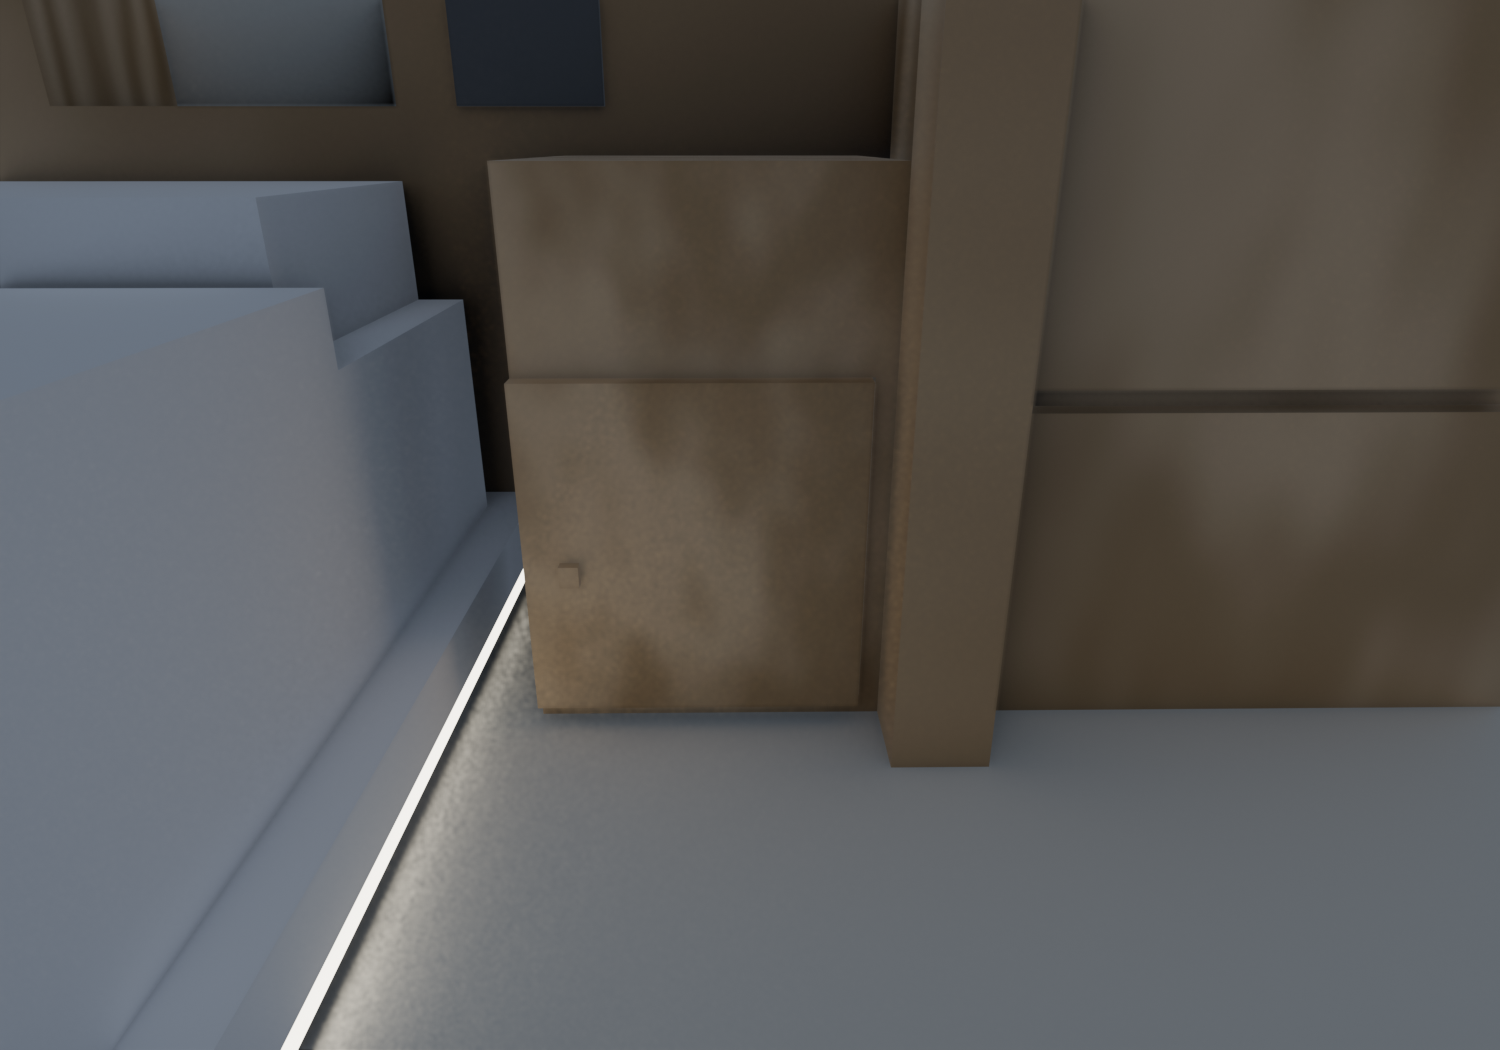
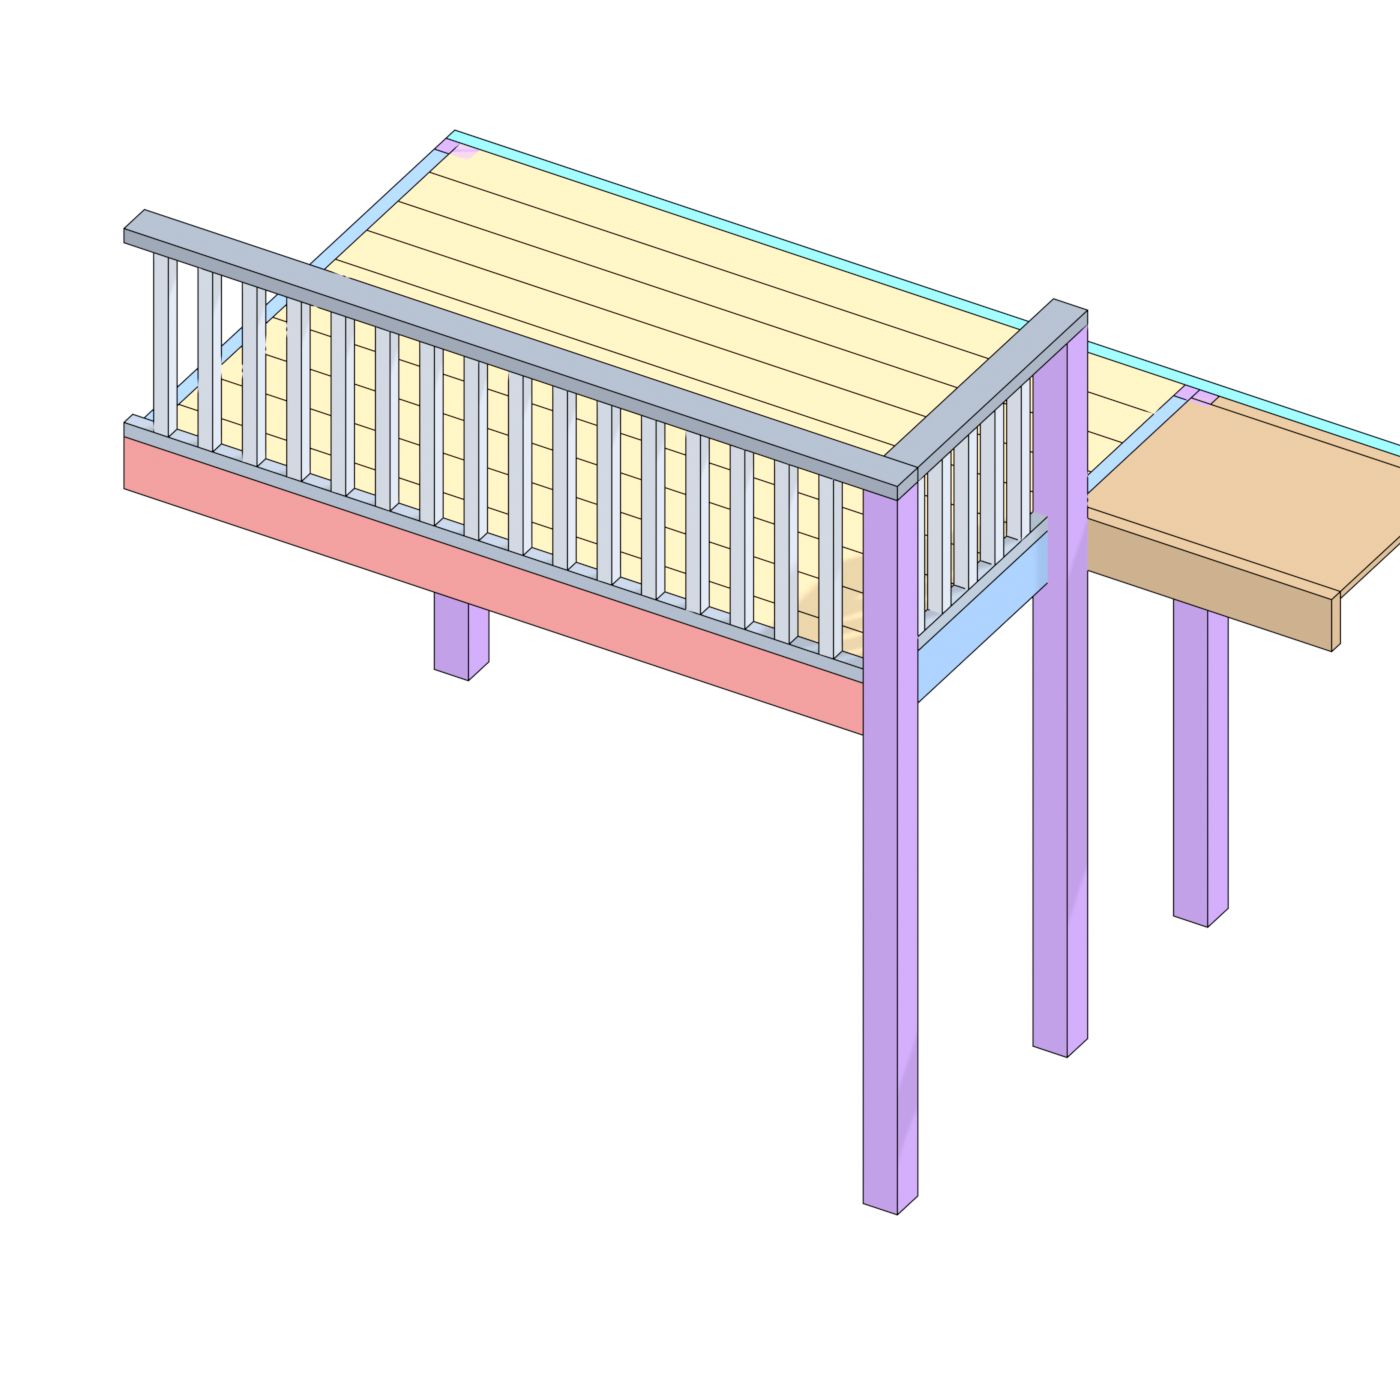
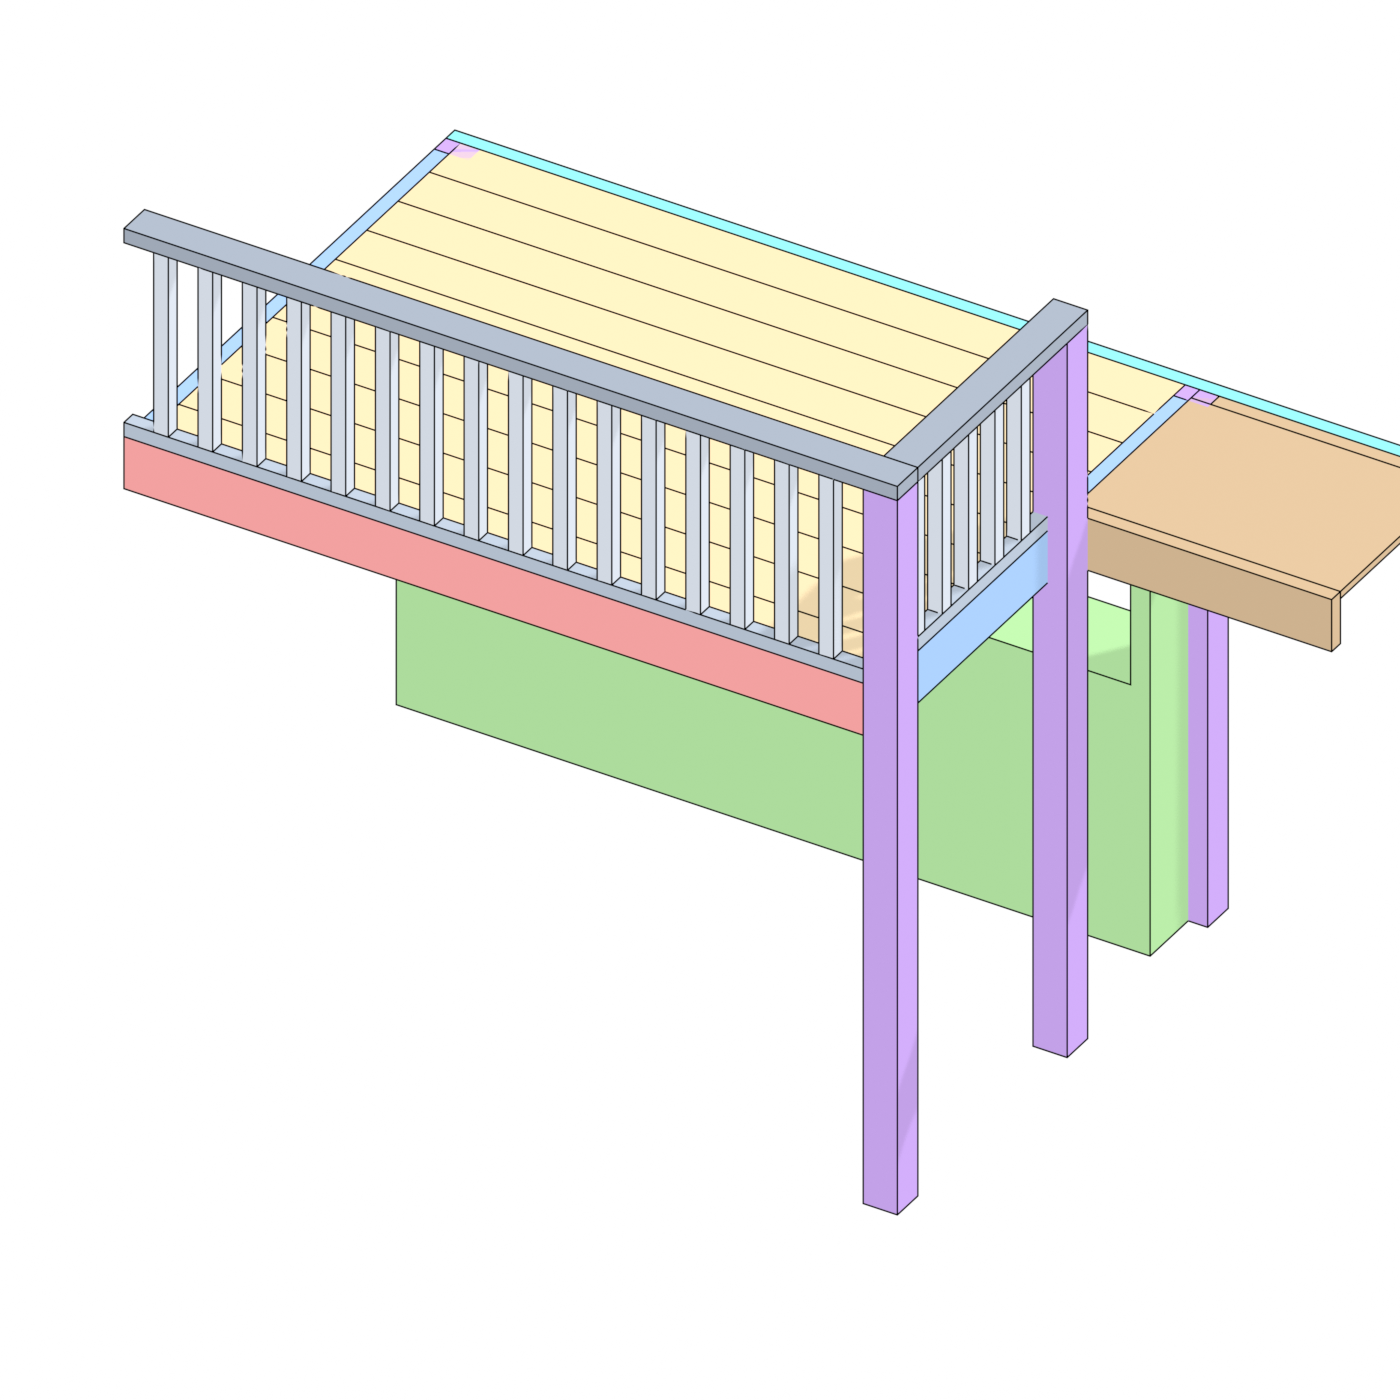
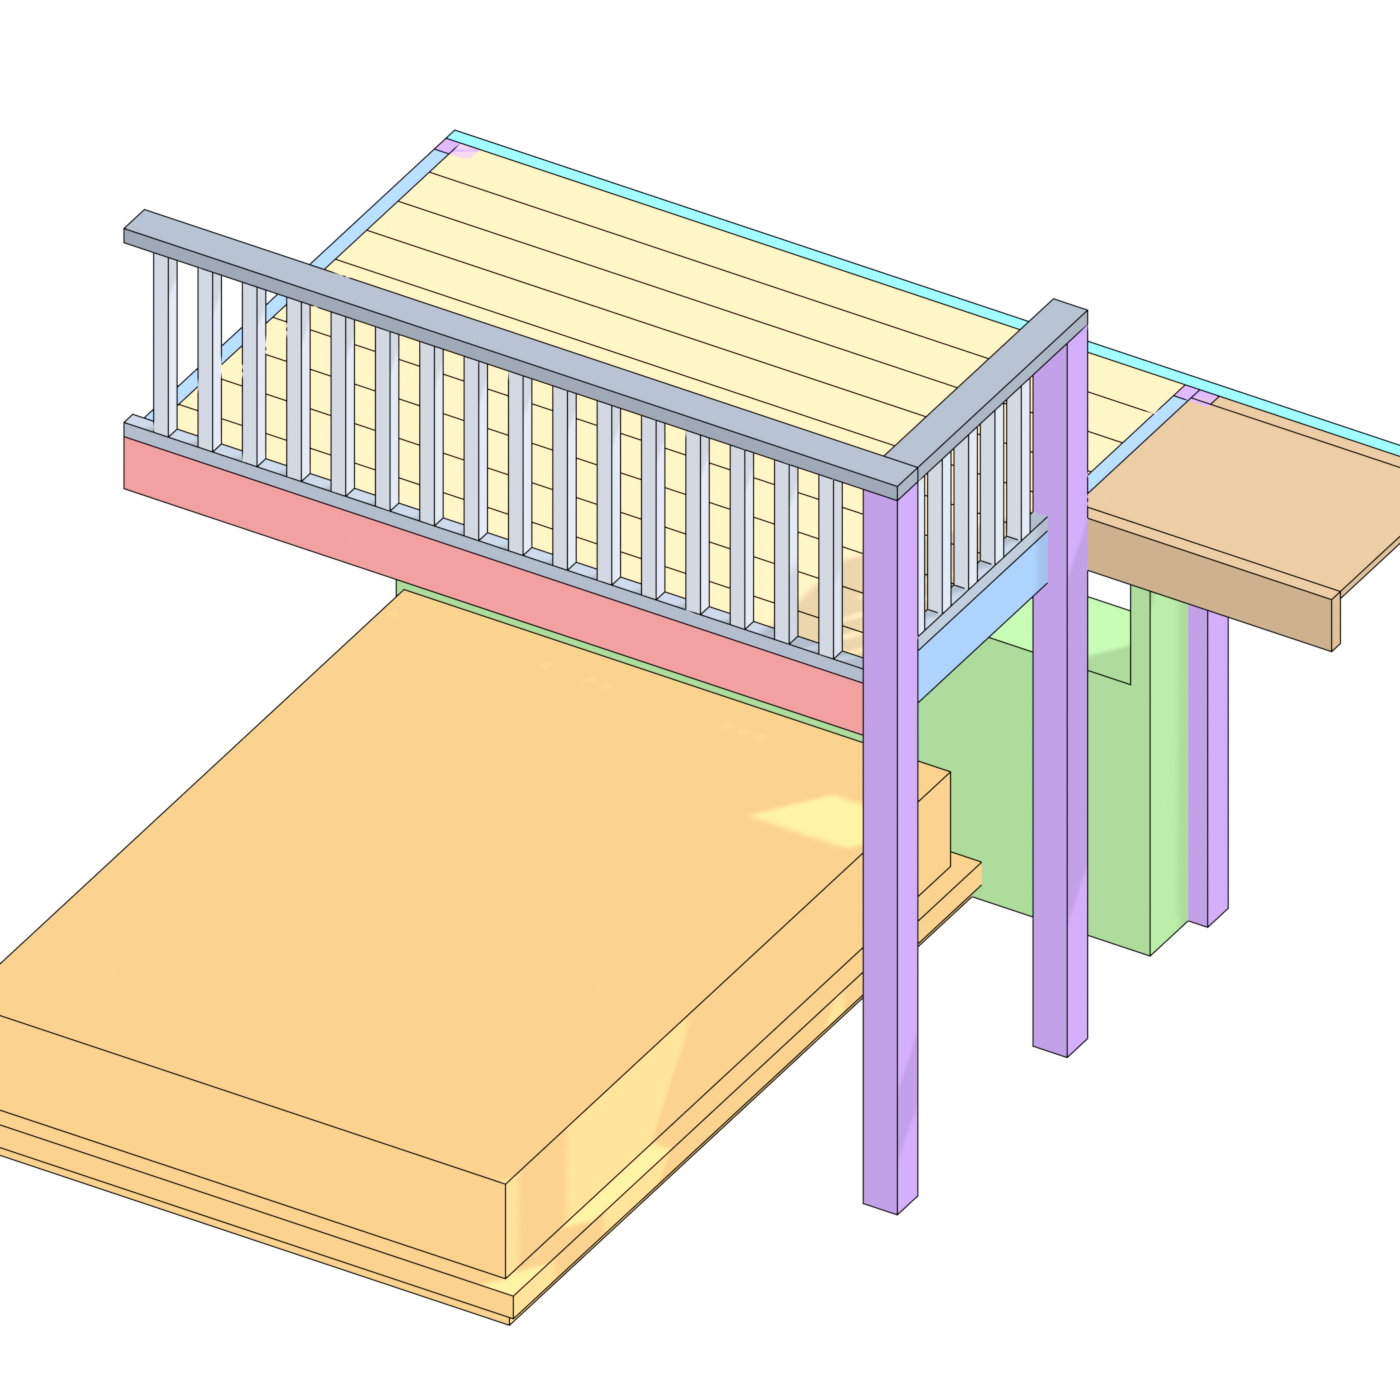
03In 3D
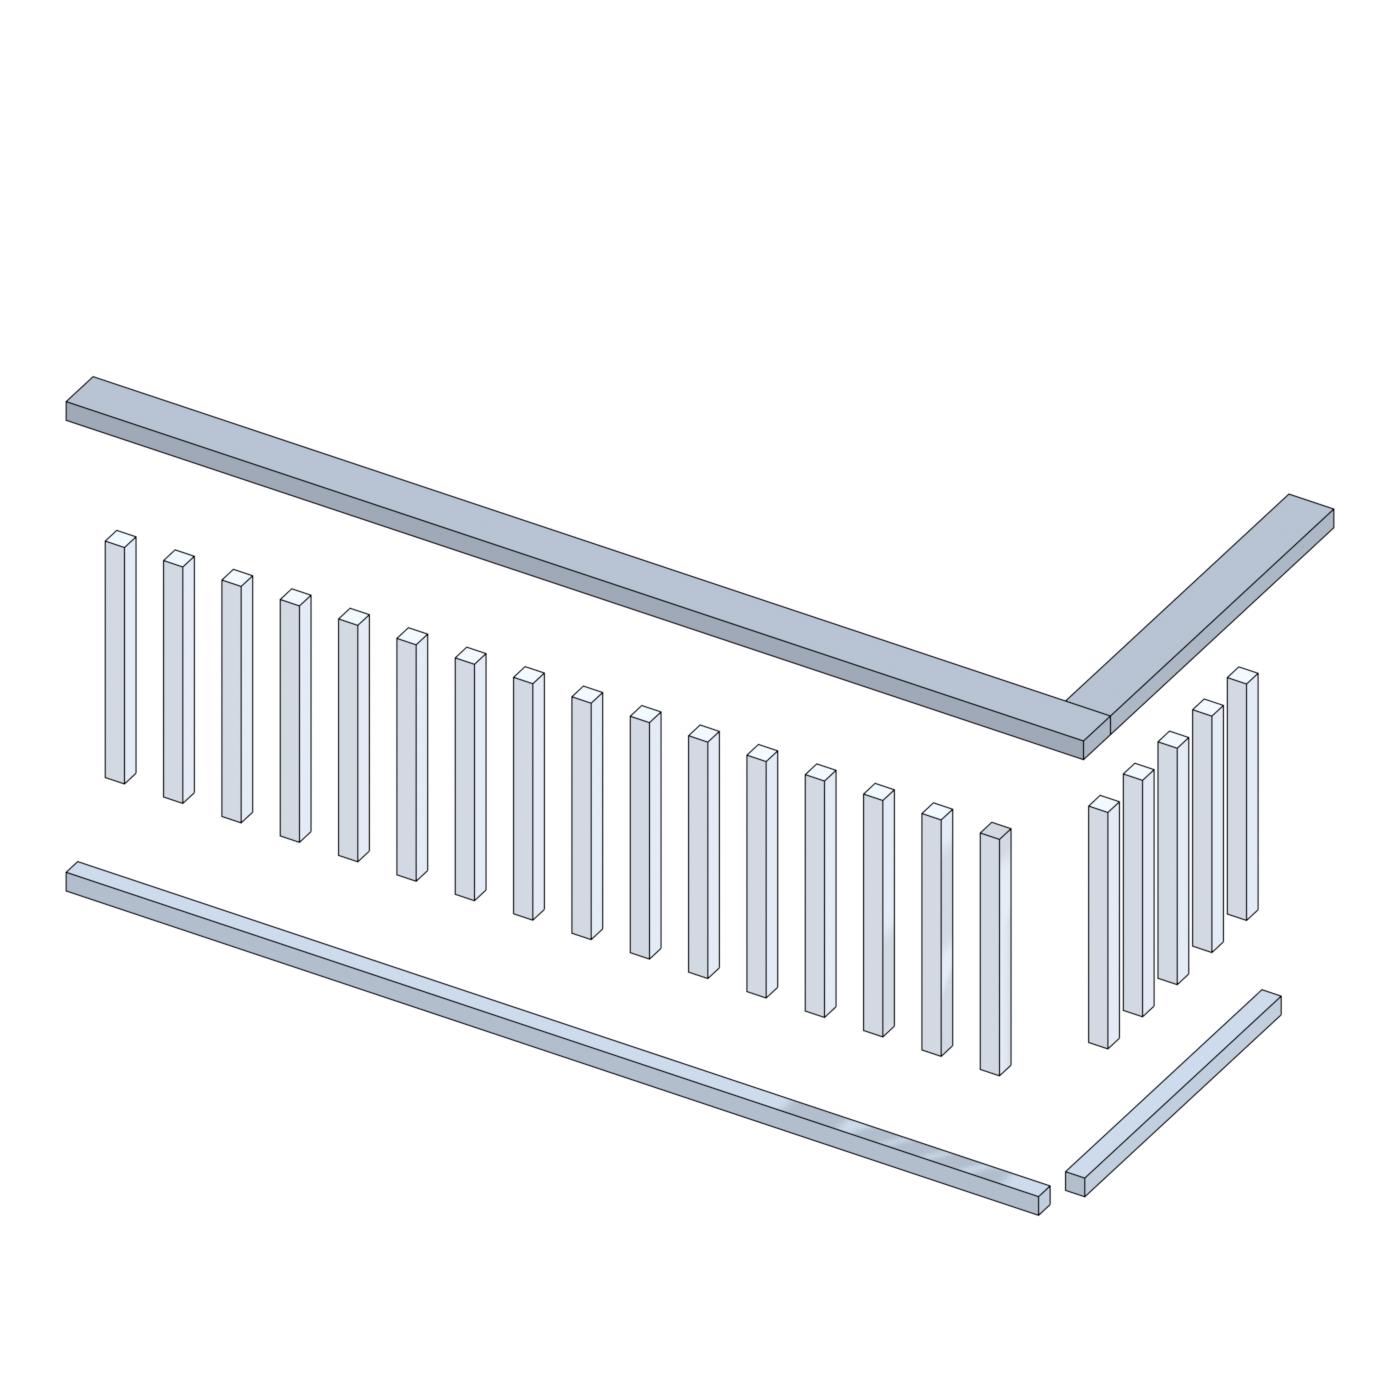
Photoreal views of the chosen railing design.
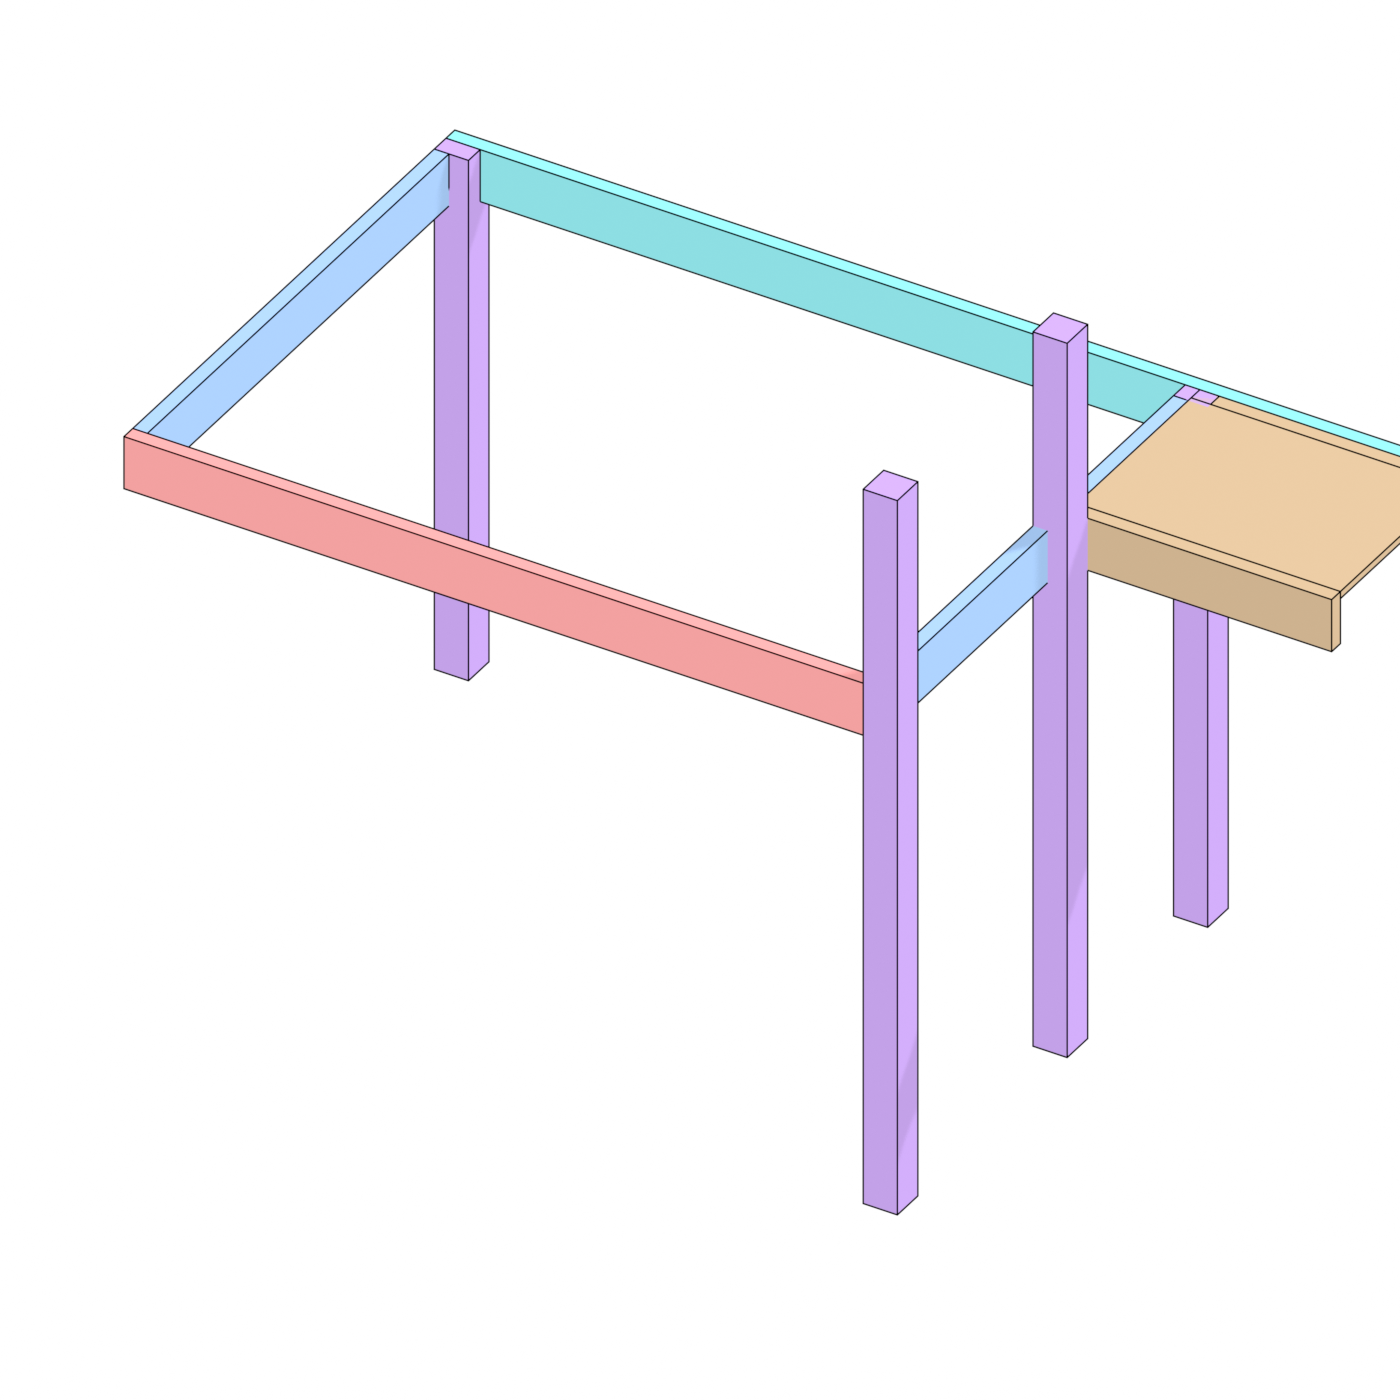
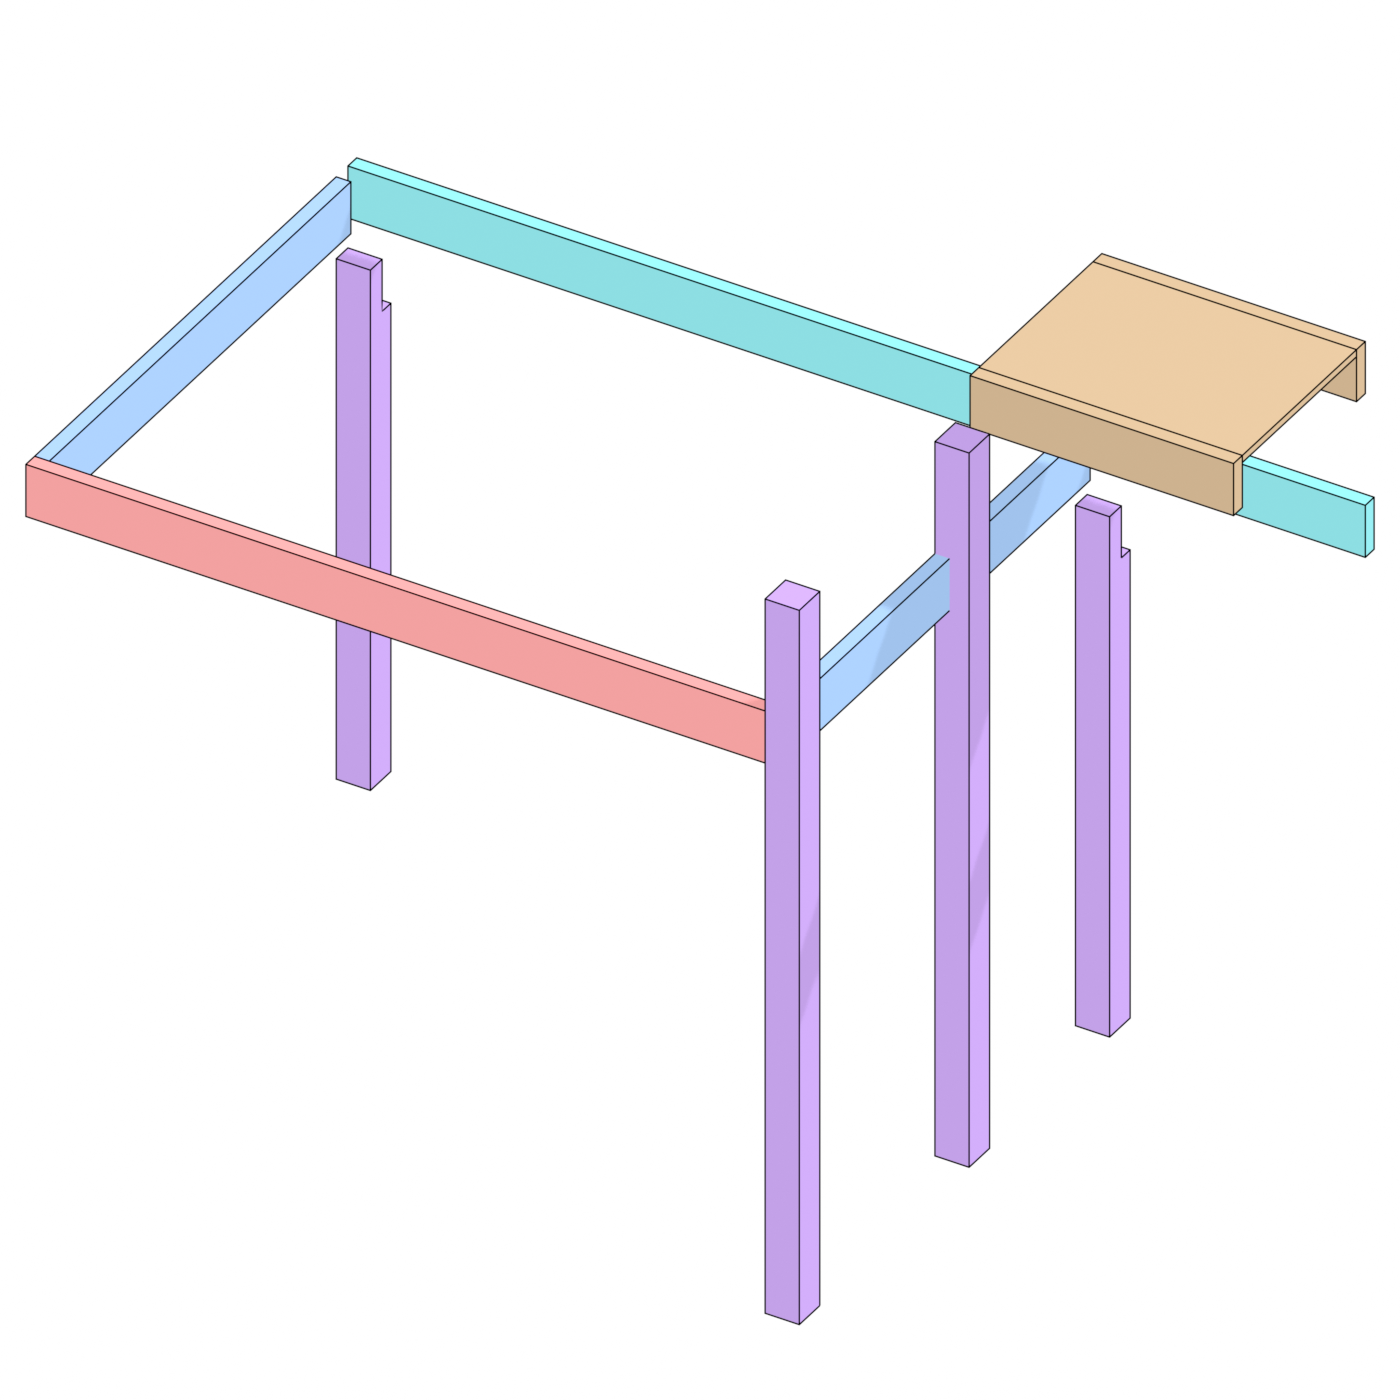
04Assembly, step by step
Flat-color assembly diagrams in build order — one fixed camera so the model never jumps between steps — plus exploded per-board breakdowns whose colors ARE the cut list (same palette as Sheet 1 and the cut tables).


05The drawings
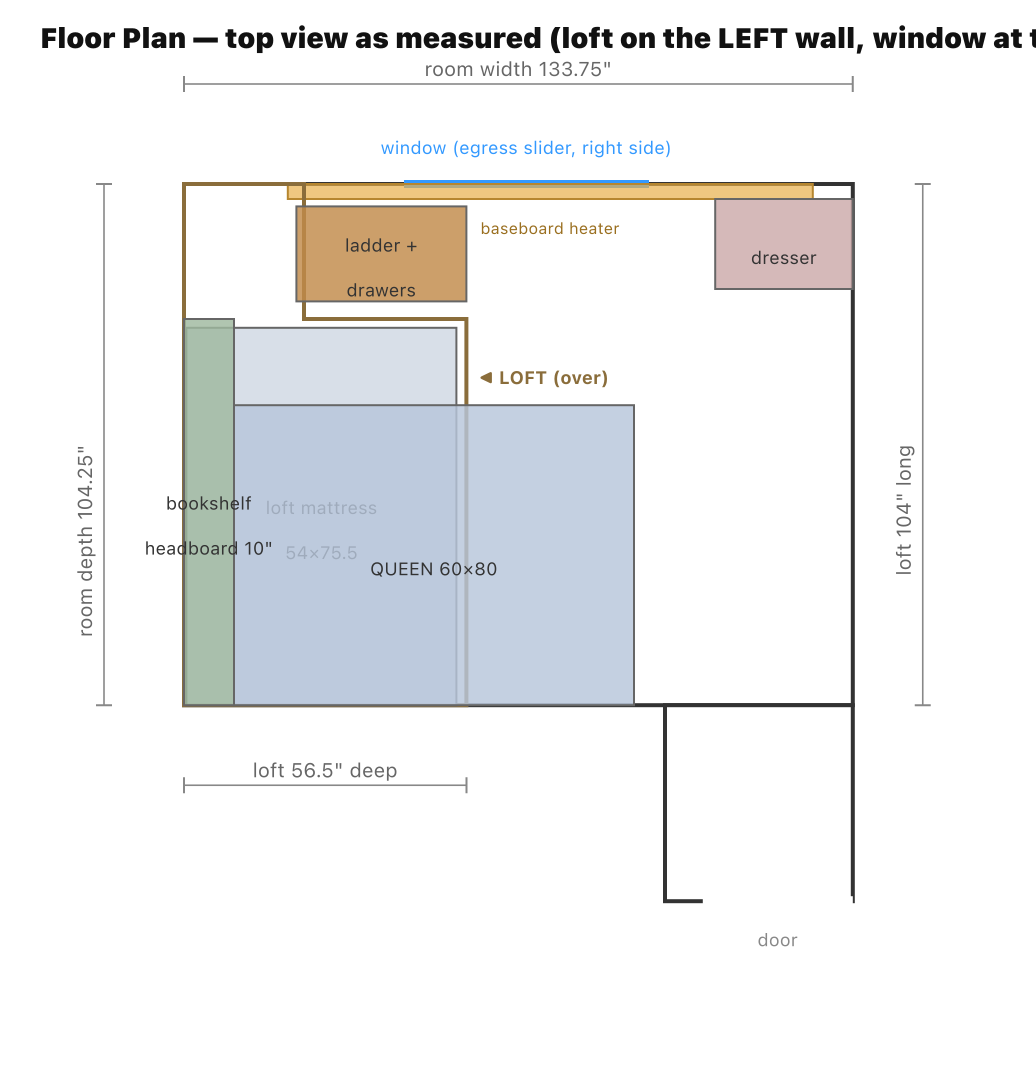
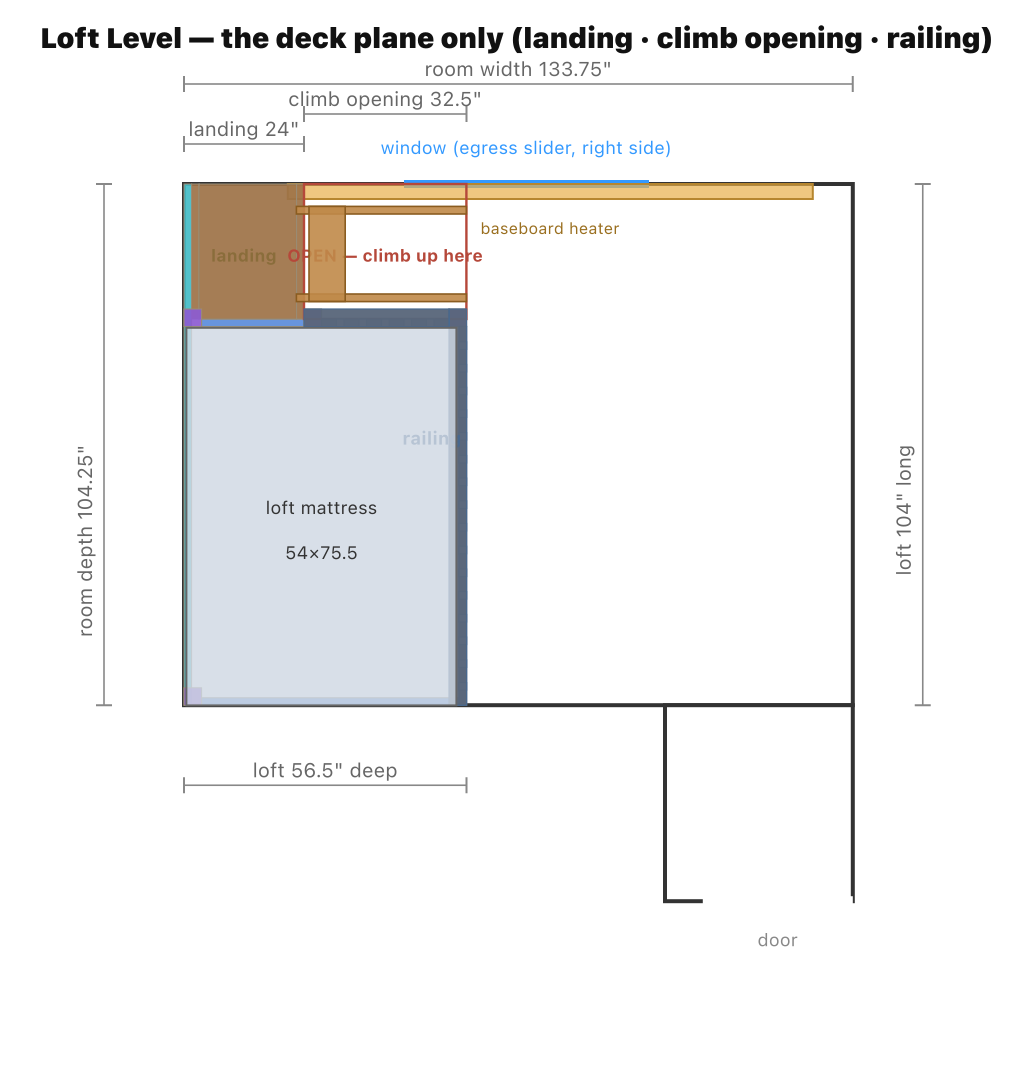
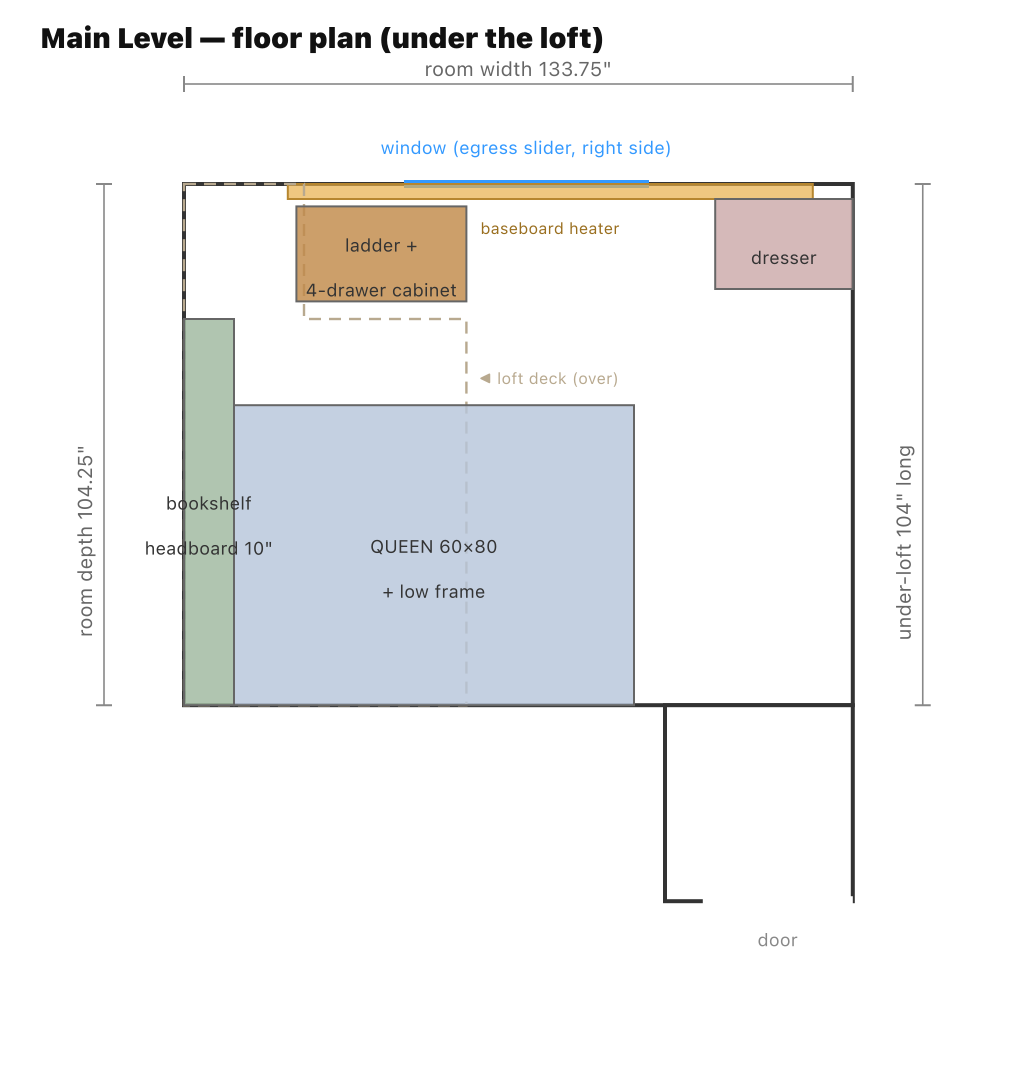
Dimensioned 2D plans drawn straight from the live 3D geometry, in the floor-plan orientation as measured (loft on the left wall, window at top) — an overview, the two levels, and a section through the headroom stack.
06Construction sheets
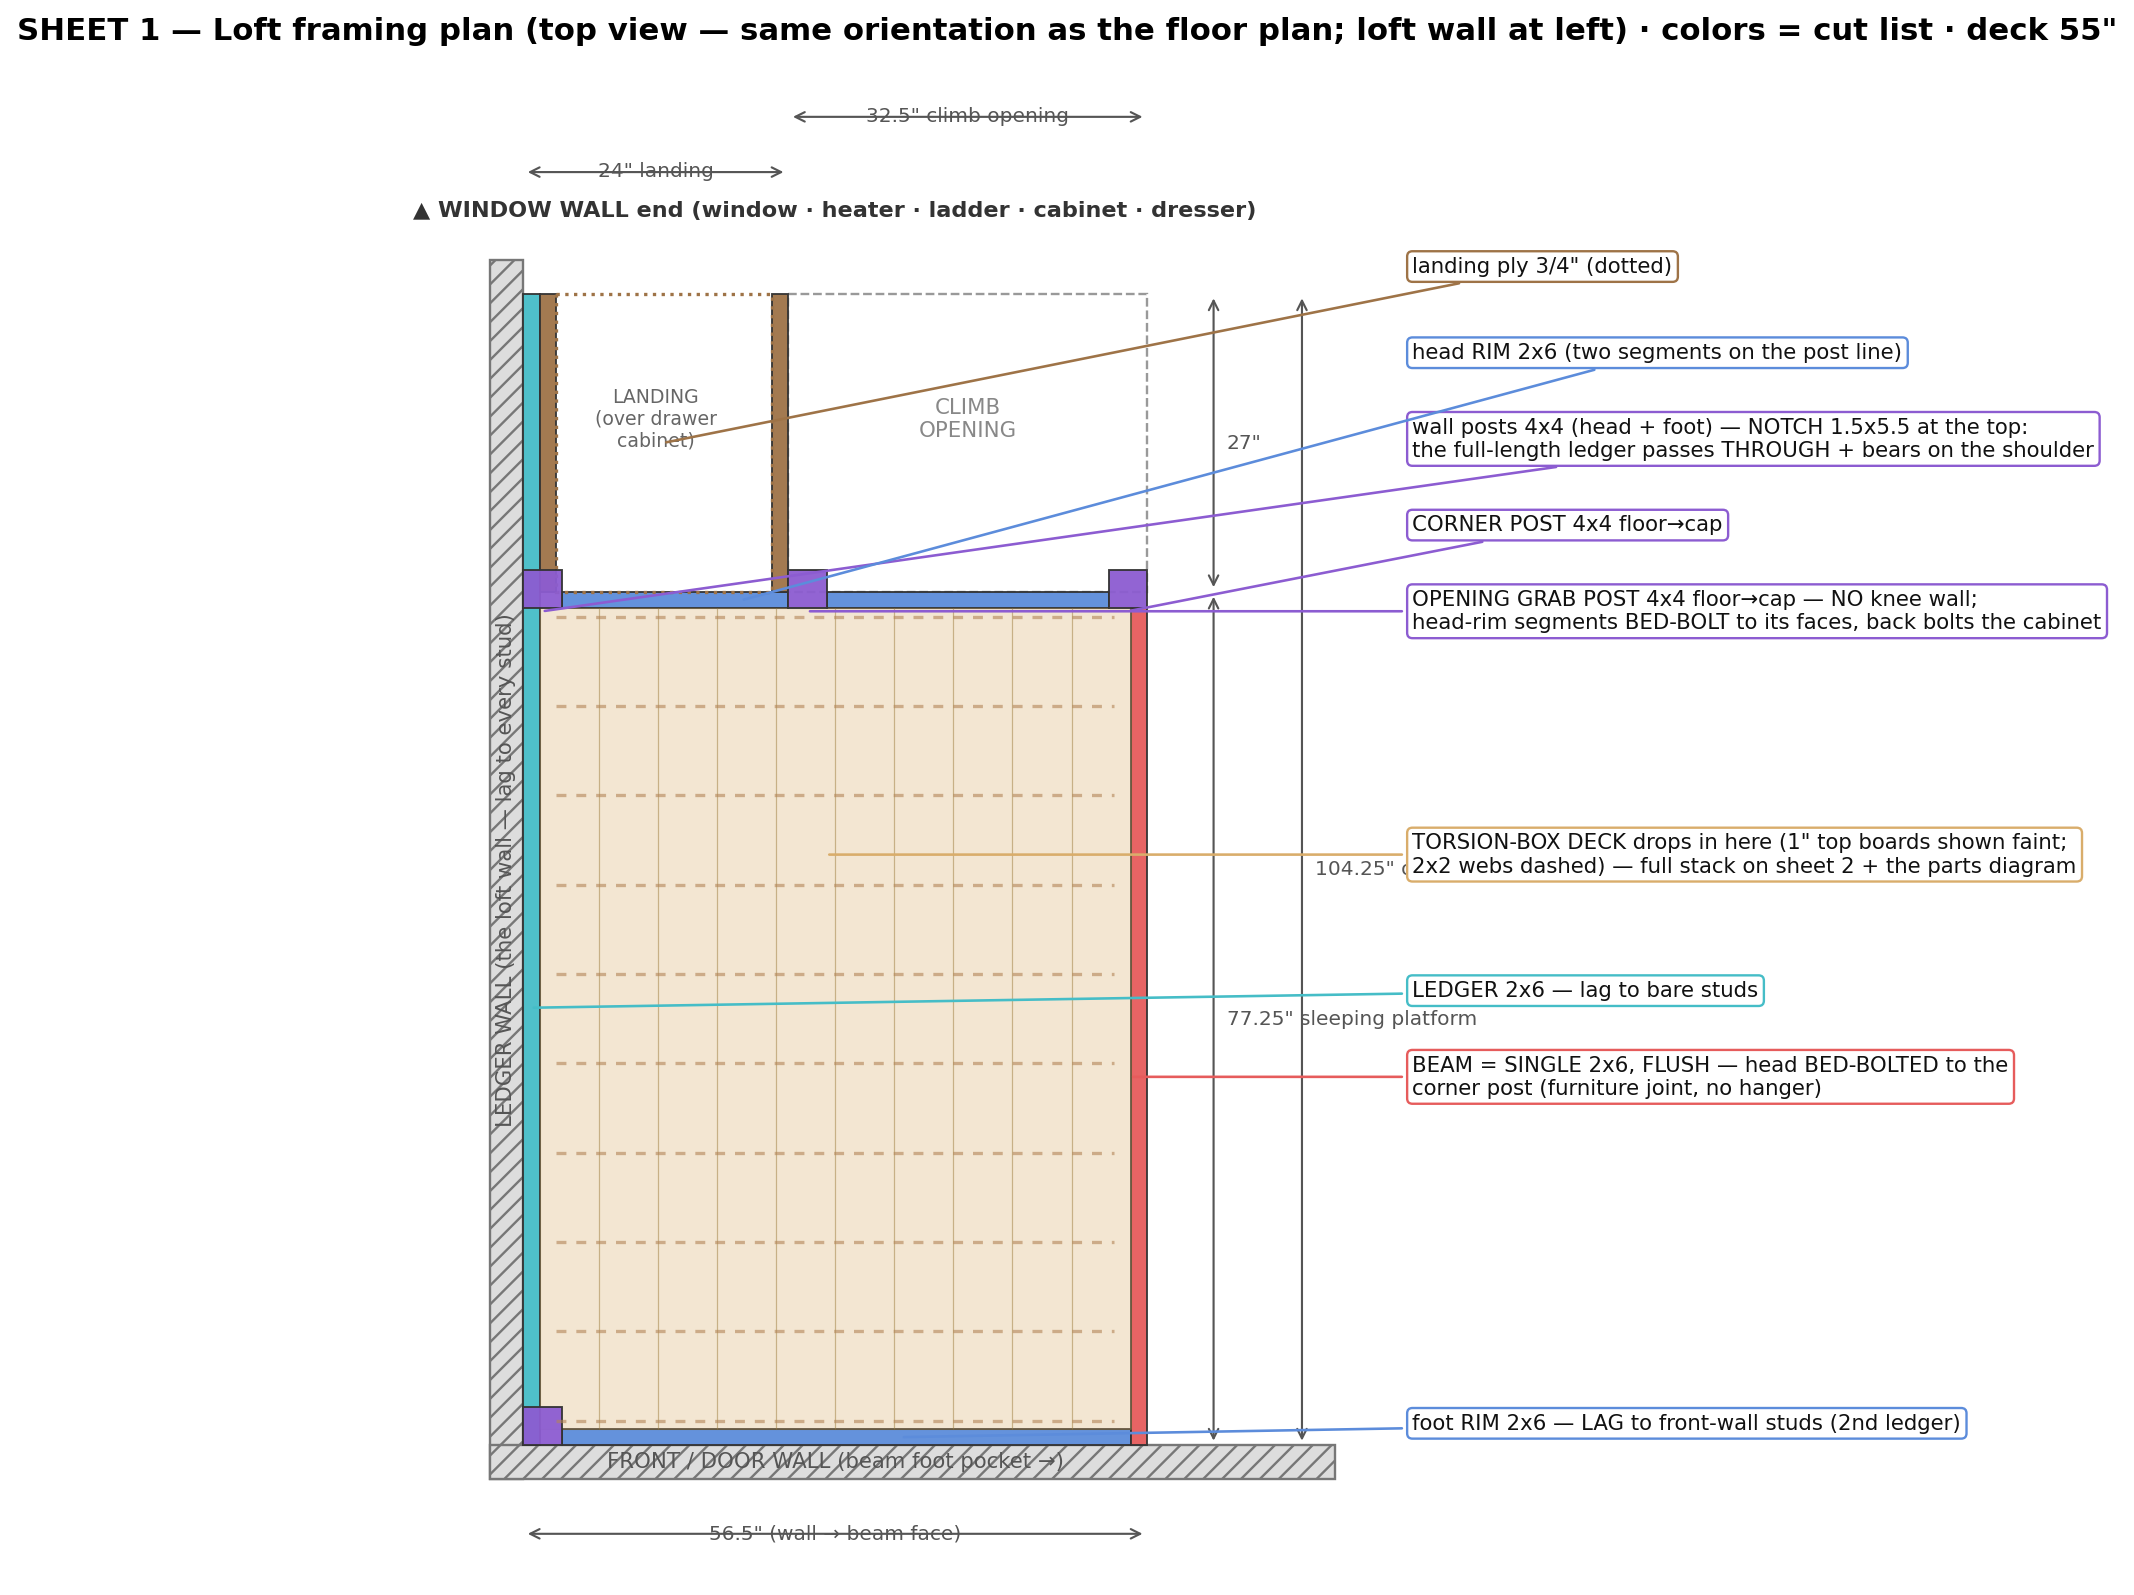
The construction sheet set — framing plan, sections, elevations, ladder geometry, and joinery details, projected from the same board registry as the 3D model and the cut list, so the drawings cannot drift from the build.


07Cutting diagram
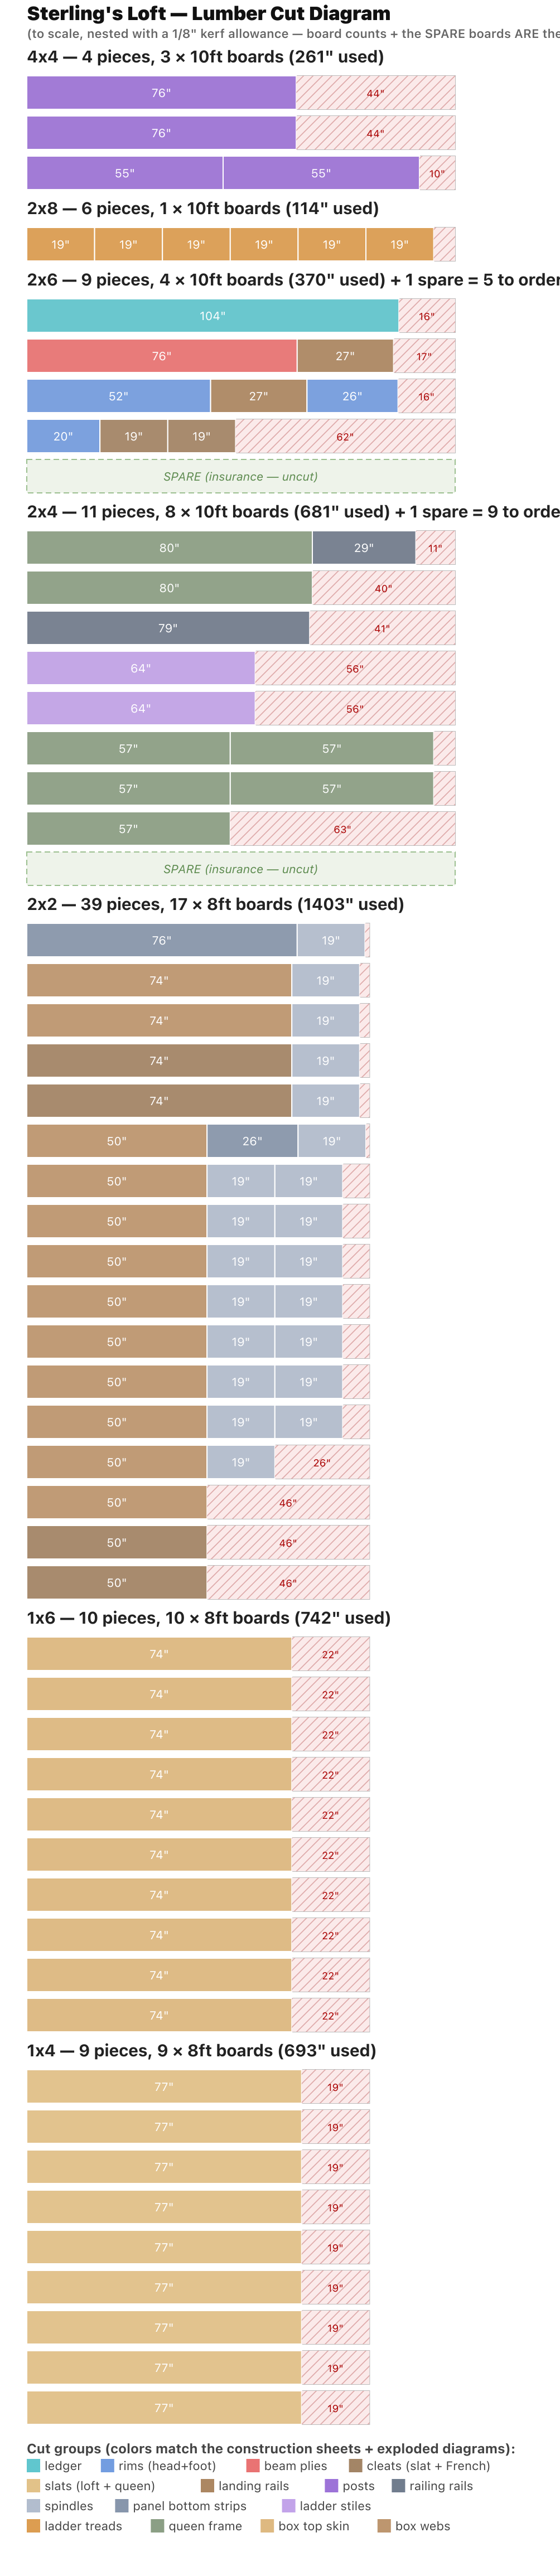
Every board to scale, nested onto standard stock with the waste shown — built straight from the cut list, and COLORED by the same cut-group palette as the construction sheets, exploded diagrams, and loft-level plan.
08Shopping list
Store-ready, grouped by aisle. Approximate CAD at Home Depot / Home Hardware — confirm in store; lumber prices move.
| Lumber (SPF) | Qty | ≈ $ |
|---|---|---|
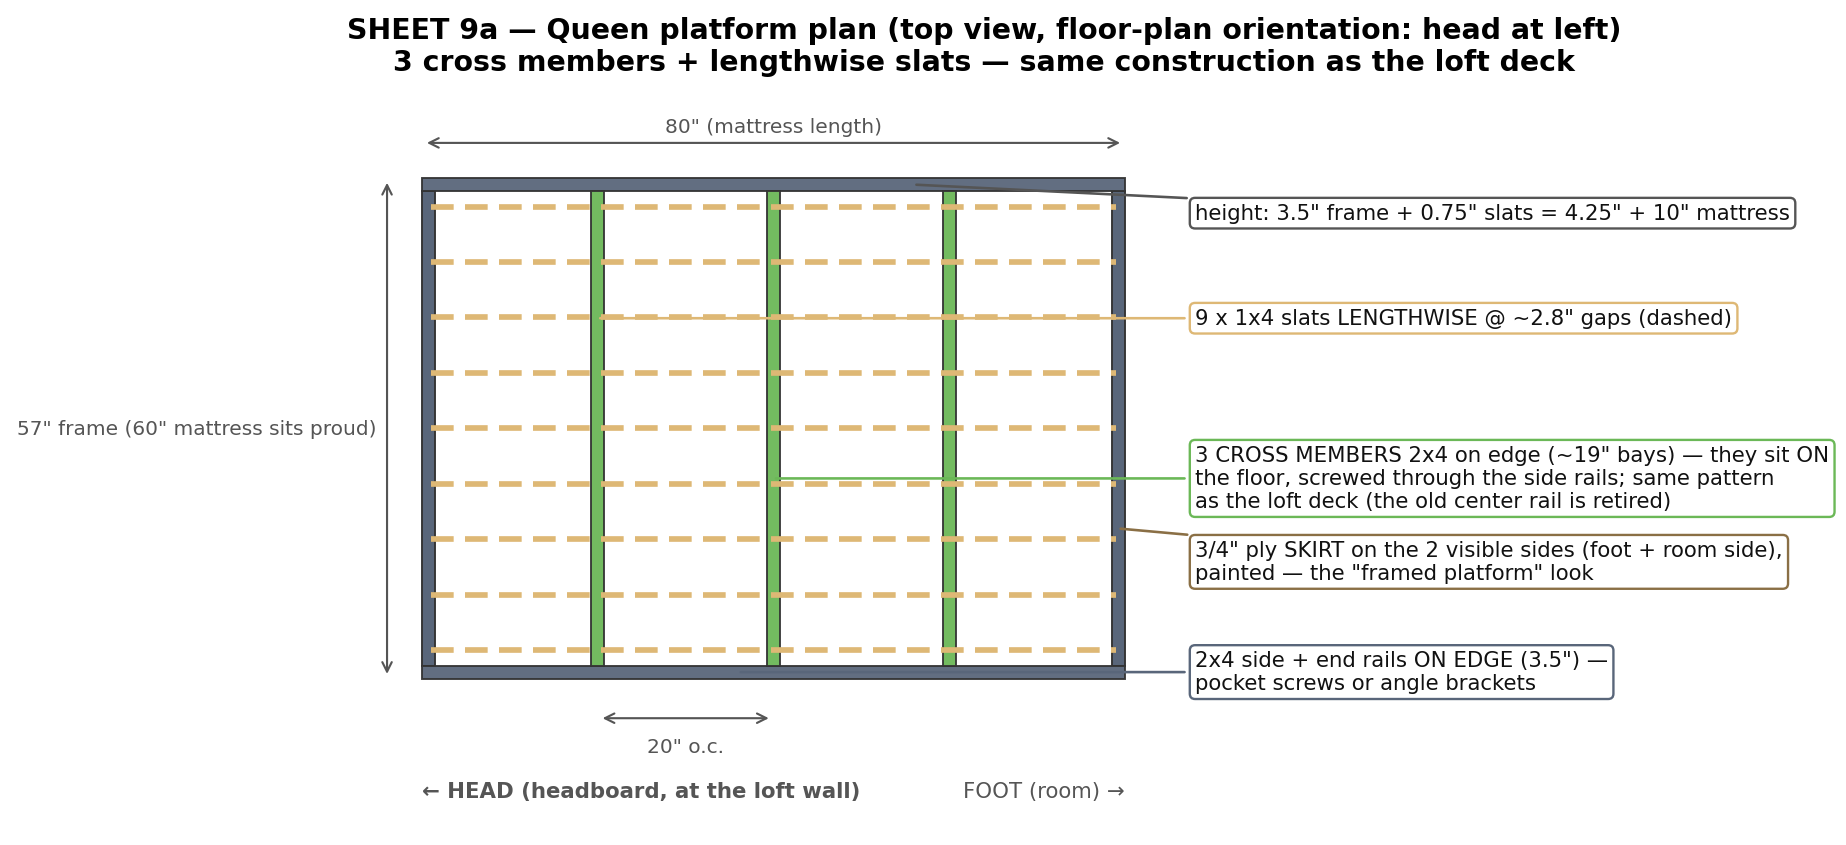
| 1×4 × 8′ — queen slats | 9 | 58 |
| 1×6 × 8′ — | 10 | 80 |
| 2×2 × 8′ — spindles + torsion-box webs + ledge | 17 | 68 |
| 2×4 × 10′ — crib top rails + queen frame · incl. 1 spare | 9 | 81 |
| 2×6 × 10′ — ledger, rims, single-2×6 beam, ladder stiles · incl. 1 spare | 5 | 55 |
| 2×8 × 10′ — ladder treads | 1 | 18 |
| 4×4 × 10′ — posts (2 wall + corner + grab post) | 3 | 90 |
| Lumber subtotal | $450 |
| Sheet goods | Qty | ≈ $ |
|---|---|---|
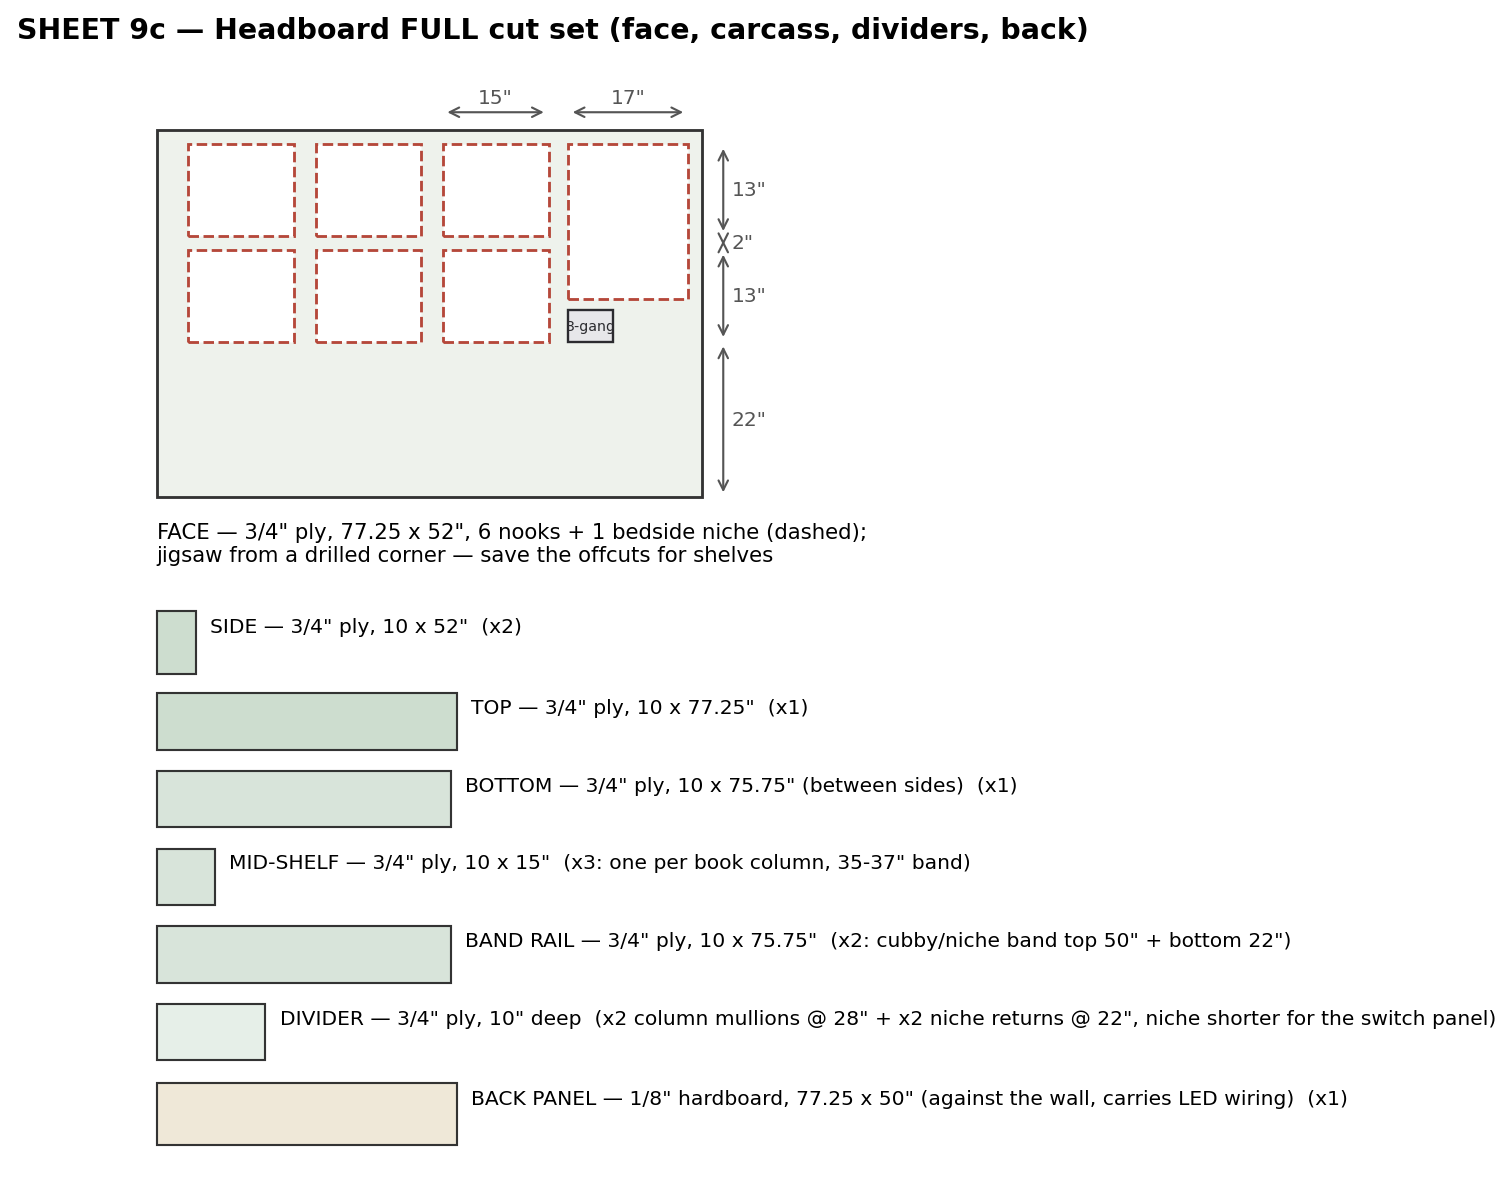
| ¾″ sanded ply — headboard (face needs a 2-piece seam) | 3 | 234 |
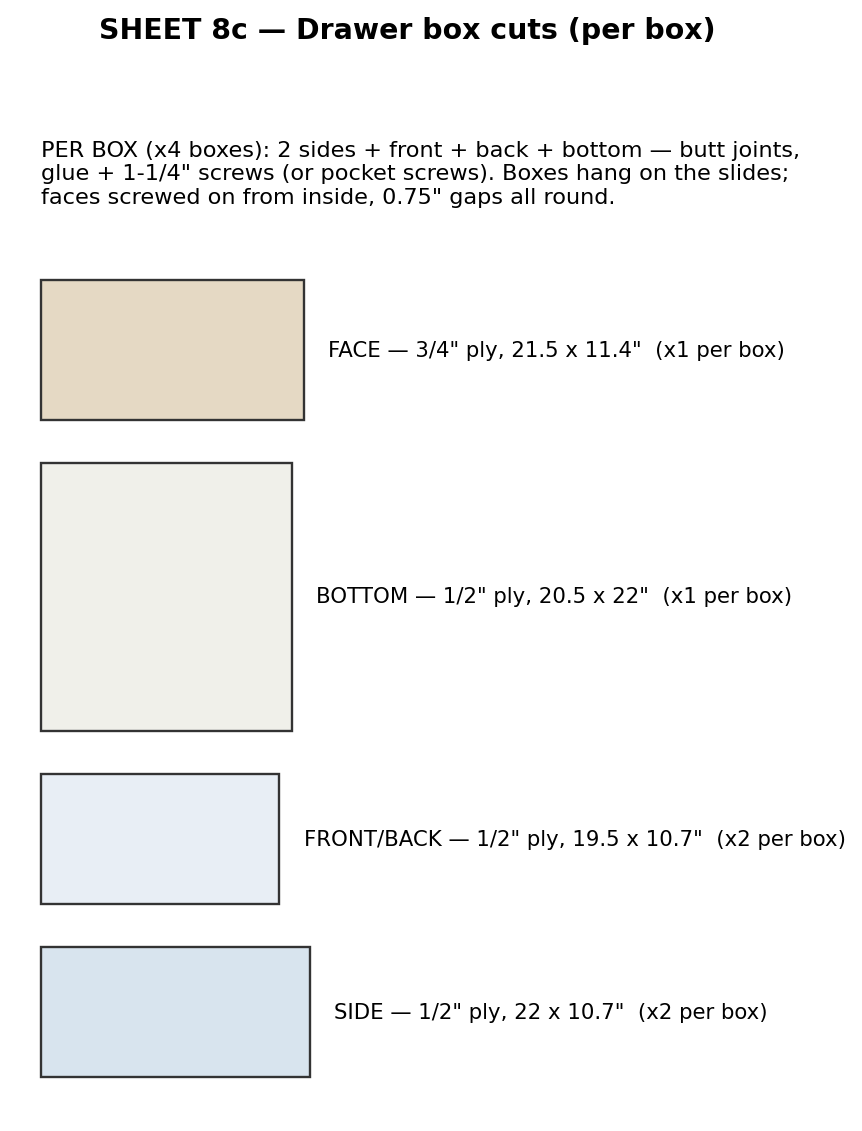
| ½″ ply — drawer cabinet + boxes | 3 | 150 |
| ¾″ ply — drawer faces + queen skirt + landing | 1 | 78 |
| ¼″ panelling — faux ceiling optional | 2 | 70 |
| Sheet-goods subtotal | $622 |
| Hardware & finish | ≈ $ |
|---|---|
| Lag screws ×15, post bases ×4 (incl. grab post), bed-bolt sets ×2 (8 bolts — no hangers, no post cap), carriage bolts ×2 | 96 |
| Structural + wood screws (the box: skins→webs every ~6″), glue ×4 tubes | 110 |
| Drawer slides ×4 pr, pulls, French-cleat latch | 95 |
| 2 Govee downlights (recess into the box) + under-bed toe-kick & headboard-shelf LED strips + panel-mount USB + 3-gang & top-bunk HA smart switches | 220 |
| Stain + poly + sundries | 80 |
| Hardware/lighting/finish | $825 |
| Cost roll-up (CAD) | ≈ $ |
|---|---|
| Subtotal | 1,944 |
| HST (13%) | 253 |
| Build total (±15%) | 1,867–2,526 |
| + new spring queen mattress | 300–700 |
| All-in | ~$2,167–3,226 |
💡 Trim the bill: Sterling's loft mattress is reused (free). The 1 spare 2×6 + 1 spare 2×4 are already in the counts (insurance); drop them for −$20 if you'd rather risk a mid-build run. The over-queen downlights are deferrable too (−$70) — the headboard shelf LEDs + under-bed glow already light the bed; the 4″ cutouts can be added later.
09Build it
Order of operations, from a level line to paint.
- Prep: mark every stud (both walls); cut the single 2×6 beam and pre-bore its bed-bolt holes (bolt clearance + cross-dowel); build the torsion box flat — shiplap bottom, glue+screw the 2×2 webs to it (rout wire channels + cut the 2× 4″ downlight holes), then glue+screw the 1″ top boards across. The glue is structural. Mark the deck line at 55″.
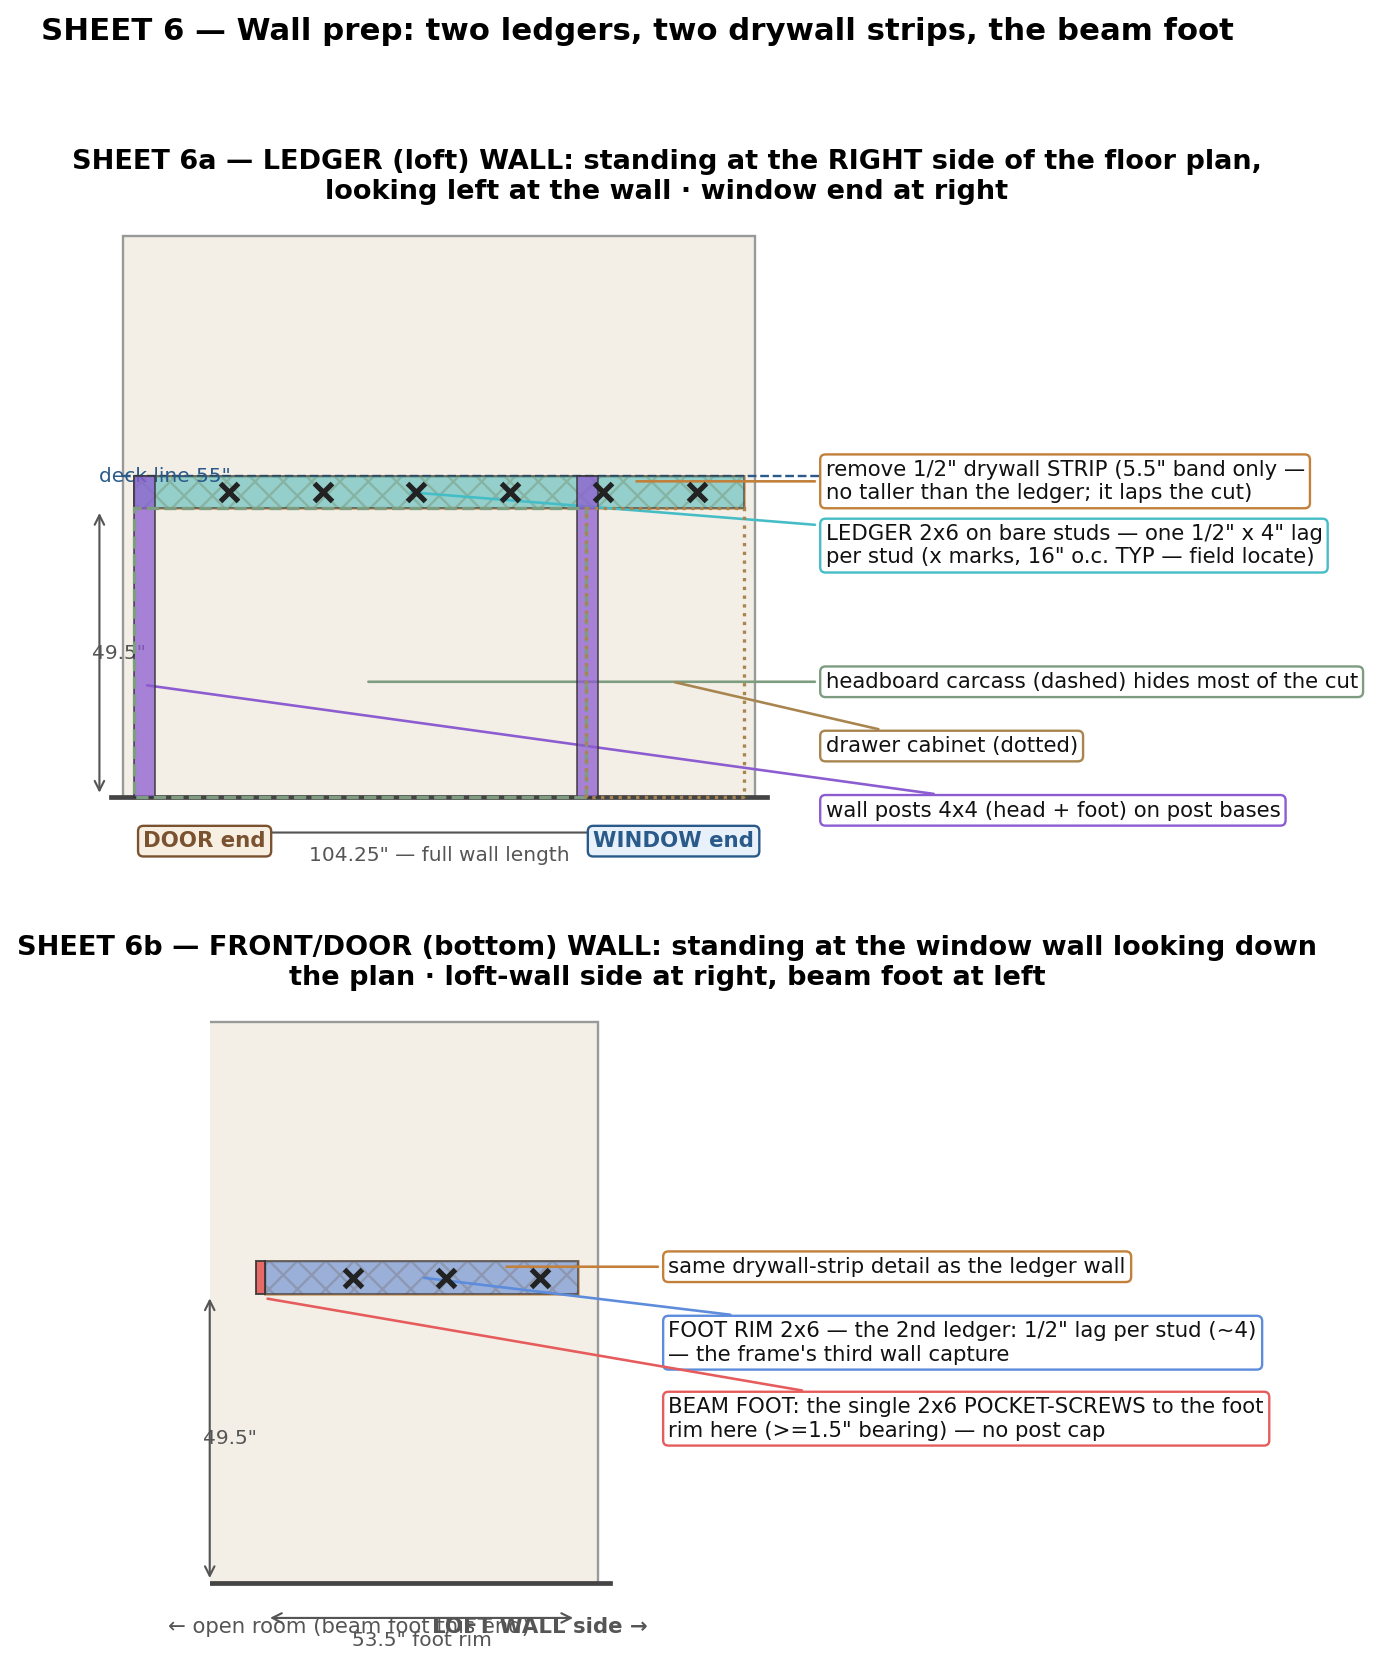
- Two ledgers: pull the ½″ drywall strips, lag the 2×6 ledger to the left-wall studs and the foot rim to the front-wall studs.
- Four posts (no knee wall): 2 wall posts, the 4×4 corner post, and the opening GRAB POST — bolt the grab post's back through the drawer cabinet.
- Beam: single 2×6 — foot pocket-screwed to the foot rim, head BED-BOLTED to the corner post (cross-dowel + 3⁄8″ bolt, counterbore plugged) — one end at a time. No hanger.
- Head rim: two segments on the post line (wall post → grab post → corner post), each end bed-bolted into the post face.
- Ledge + drop the deck: screw the 2×2 perimeter ledge inside the frame (top at 52″); lift the prefab torsion box in and drop it on — top boards finish flush at the deck; screw it down.
- Landing: set the cabinet, add the 2 edge rails + the ¾″ ply landing flush with the deck.
- Railing: stand the prefab crib panels — strip + spindles (<3.3″ gaps) + flat 2×4 rail running OVER the post tops; rail ends lag into the posts — cap 22″ above the deck, 30″ opening.
- Headboard: the 10″ hollow-to-wall bookshelf — two EQUAL 13″ book rows (3 cols) over the queen + one big bedside display niche over the nightstand; warm-white LED strips in channels on the front lip of every opening (wiring behind the 1/8″ back panel); fasten to wall/posts.
- Ladder + drawers: stiles, 6 treads, French-cleat pair + drop-pin.
- Queen + lighting: low 4″ 2×4 platform; skirt with a toe-kick LED reveal; set the 2 Govee downlights into the box bottom-skin cutouts + the headboard shelf LEDs. A 3-gang HA switch at the bedside niche (shelf LEDs · downlights · under-bed glow) + one on the wall beside the loft pillow (top bunk).
- Finish: sand, stainable filler, STAIN + 2-3 coats poly (the top deck boards get 3). Mattresses on.
10Built to hold
Will it hold, and is it kid-proof? An informal engineering review says yes — the lumber is oversized for the load, so the attention goes to the connections and bracing that loft beds actually fail on.
- Sized like a bed, not a floor. The deck is a 3″ torsion box — the two skins held apart make a section ~6× a 1″ slat's strength and ~21× its stiffness. Distributed it takes well over 1,000 lb; a concentrated load on even a 6″ patch is good for ~900 lb safe. Past the 500 lb target.
- Open cavity = headroom. Nothing thick hangs into the head space — the box bottom is at 52″ and the head rises into the open frame cavity to it (~38″ over the queen). The room-side beam stays at 49.5″ over the foot.
- The glue is the structure. The skins are glued + screwed to the webs so the box acts as one piece — that bond creates the deep section; without it you'd have two loose panels.
- Two ledgers + the rigid deck. Lateral comes from the ledger wall, the front-wall foot rim, the bolted grab/corner posts, and the rigid torsion-box diaphragm — no knee wall, no gussets.
⚠️ Informal review, not a stamped calc. Sized as a bunk, not a floor — the torsion box runs well past the 500 lb target, and the single-2×6 beam clears even the 40 psf floor standard (~2.8× as a bunk). The real work is the connections: pull the drywall and lag both ledgers to bare studs; bed-bolt the beam head and the rim segments to the posts (no hangers); pocket-screw the beam foot to the foot rim; bolt the grab post to the cabinet. Check permit / classification with the Township of Minden Hills. Full writeup: planning/STRUCTURAL.md.
11Verified before cutting
An automated harness checks the model's geometry — fit, clearances, and child-safety — and fails the build with a number if anything's wrong. All 12 pass.